
Incoming links: g5.xlarge
AWS Deep Learning Base GPU AMI (Ubuntu 20.04) Updated 2025-07-16
These come with pre-installed drivers, so e.g. nvidia-smi just works on them out of the box, tested on g5.xlarge which has an Nvidia A10G GPU. Good choice as a starting point for deep learning experiments.
ludicrains/deep-gaze Updated 2025-07-16
This just works, but it is also so incredibly slow that it is useless (or at least the quality it reaches in the time we have patience to wait from), at least on any setup we've managed to try, including e.g. on an Nvidia A10G on a g5.xlarge. Running:would likely take hours to complete.
time imagine "a house in the forest" Ollama Updated 2025-07-16
Ollama is a highly automated open source wrapper that makes it very easy to run multiple Open weight LLM models either on CPU or GPU.
Its README alone is of great value, serving as a fantastic list of the most popular Open weight LLM models in existence.
Install with:
curl https://ollama.ai/install.sh | shOn P14s it runs on CPU and generates a few tokens per second, which is quite usable for a quick interactive play.
As mentioned at github.com/jmorganca/ollama/blob/0174665d0e7dcdd8c60390ab2dd07155ef84eb3f/docs/faq.md the downloads to under The file:gives a the exact model name and parameters.
/usr/share/ollama/.ollama/models/ and ncdu tells me:--- /usr/share/ollama ----------------------------------
3.6 GiB [###########################] /.ollama
4.0 KiB [ ] .bashrc
4.0 KiB [ ] .profile
4.0 KiB [ ] .bash_logout/usr/share/ollama/.ollama/models/manifests/hf.co/mlabonne/Meta-Llama-3.1-8B-Instruct-abliterated-GGUF/Q2_KWe can also do it non-interactively with:which gave me:but note that there is a random seed that affects each run by default. ollama-expect is an attempt to make the output deterministic.
/bin/time ollama run llama2 'What is quantum field theory?'0.13user 0.17system 2:06.32elapsed 0%CPU (0avgtext+0avgdata 17280maxresident)k
0inputs+0outputs (0major+2203minor)pagefaults 0swapsSome other quick benchmarks from Amazon EC2 GPU on a g4nd.xlarge instance which had an Nvidia Tesla T4:and on Nvidia A10G in an g5.xlarge instance:
0.07user 0.05system 0:16.91elapsed 0%CPU (0avgtext+0avgdata 16896maxresident)k
0inputs+0outputs (0major+1960minor)pagefaults 0swaps0.03user 0.05system 0:09.59elapsed 0%CPU (0avgtext+0avgdata 17312maxresident)k
8inputs+0outputs (1major+1934minor)pagefaults 0swapsIt tends to babble quite a lot by default, but eventually decides to stop.
runwayml/stable-diffusion Updated 2025-07-16
Someone should package this better for end user "just works after Conda install" image generation, it is currently much more of a library setup.
Tested on Amazon EC2 on a g5.xlarge machine, which has an Nvidia A10G, using the AWS Deep Learning Base GPU AMI (Ubuntu 20.04) image.
First install Conda as per Section "Install Conda on Ubuntu", and then just follow the instructions from the README, notably the Reference sampling script section.This took about 2 minutes and generated 6 images under
git clone https://github.com/runwayml/stable-diffusion
cd stable-diffusion/
git checkout 08ab4d326c96854026c4eb3454cd3b02109ee982
conda env create -f environment.yaml
conda activate ldm
mkdir -p models/ldm/stable-diffusion-v1/
wget -O models/ldm/stable-diffusion-v1/model.ckpt https://huggingface.co/CompVis/stable-diffusion-v-1-4-original/resolve/main/sd-v1-4.ckpt
python scripts/txt2img.py --prompt "a photograph of an astronaut riding a horse" --plmsoutputs/txt2img-samples/samples, includining an image outputs/txt2img-samples/grid-0000.png which is a grid montage containing all the six images in one: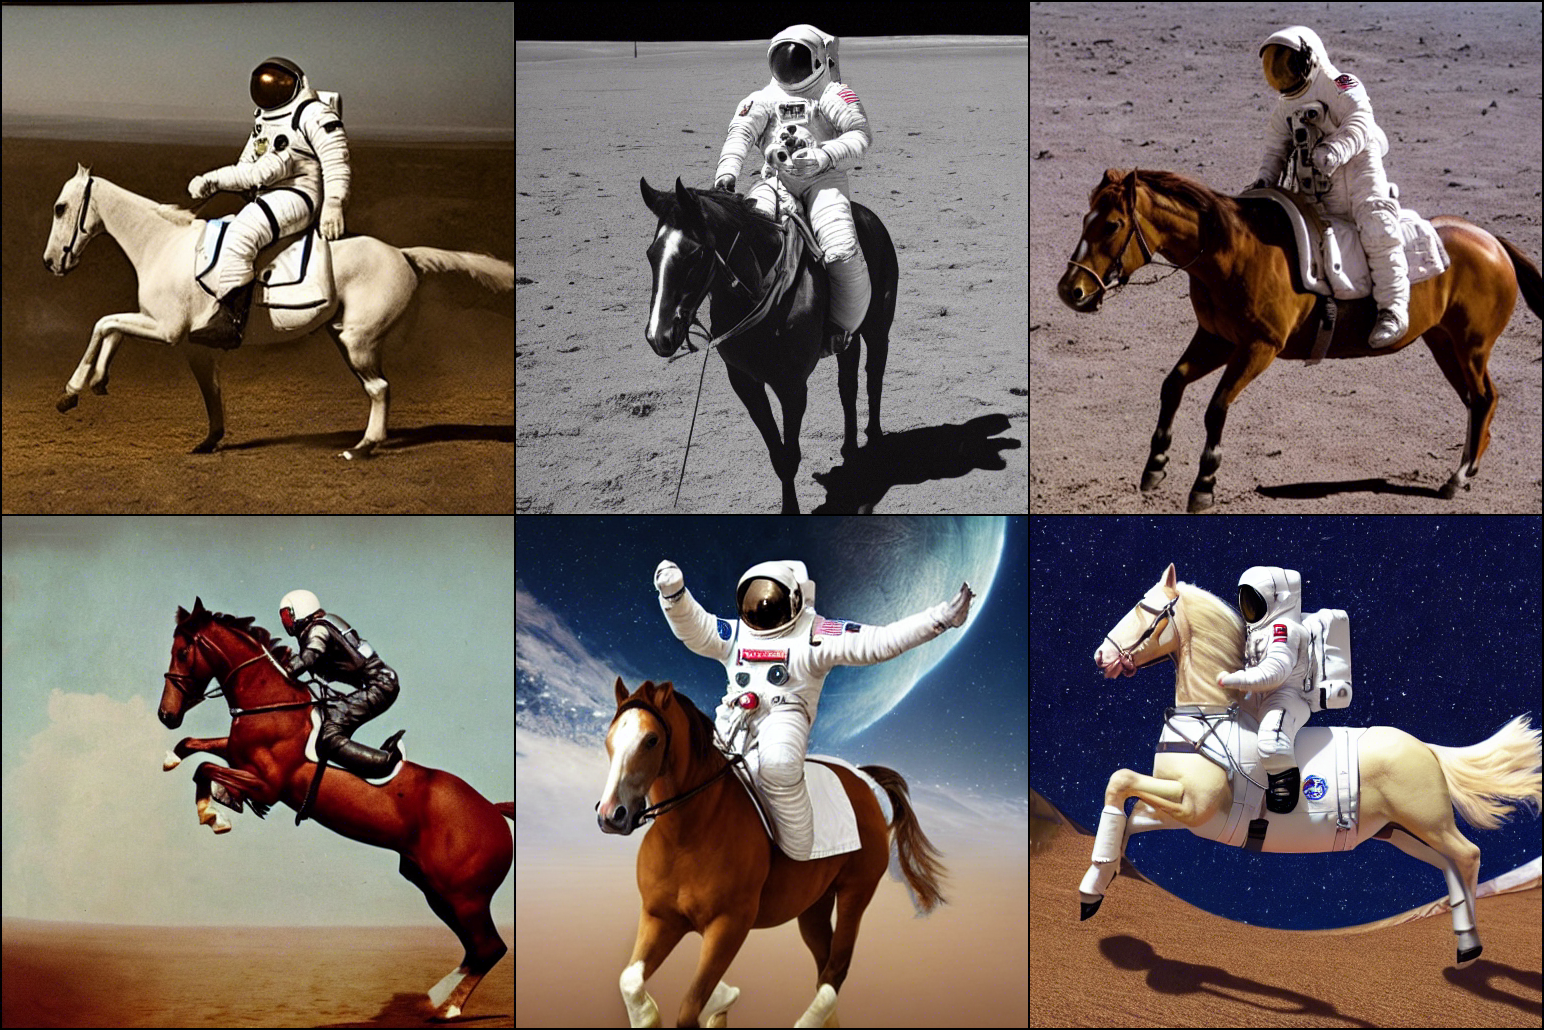
A quick attempt at removing their useless safety features (watermark and NSFW text filter) is:but that produced 4 black images and only two unfiltered ones. Also likely the lack of sexual training data makes its porn suck, and not in the good way.
diff --git a/scripts/txt2img.py b/scripts/txt2img.py
index 59c16a1..0b8ef25 100644
--- a/scripts/txt2img.py
+++ b/scripts/txt2img.py
@@ -87,10 +87,10 @@ def load_replacement(x):
 def check_safety(x_image):
     safety_checker_input = safety_feature_extractor(numpy_to_pil(x_image), return_tensors="pt")
     x_checked_image, has_nsfw_concept = safety_checker(images=x_image, clip_input=safety_checker_input.pixel_values)
-    assert x_checked_image.shape[0] == len(has_nsfw_concept)
-    for i in range(len(has_nsfw_concept)):
-        if has_nsfw_concept[i]:
-            x_checked_image[i] = load_replacement(x_checked_image[i])
+    #assert x_checked_image.shape[0] == len(has_nsfw_concept)
+    #for i in range(len(has_nsfw_concept)):
+    #    if has_nsfw_concept[i]:
+    #        x_checked_image[i] = load_replacement(x_checked_image[i])
     return x_checked_image, has_nsfw_concept


@@ -314,7 +314,7 @@ def main():
                             for x_sample in x_checked_image_torch:
                                 x_sample = 255. * rearrange(x_sample.cpu().numpy(), 'c h w -> h w c')
                                 img = Image.fromarray(x_sample.astype(np.uint8))
-                                img = put_watermark(img, wm_encoder)
+                                # img = put_watermark(img, wm_encoder)
                                 img.save(os.path.join(sample_path, f"{base_count:05}.png"))
                                 base_count += 1