
All of them need a vacuum because you can't shoot elecrons through air, as mentioned at Video "50,000,000x Magnification by AlphaPhoenix (2022)".
Ciro Santilli is very happy to meet people with related interests, he really loves his like-minded online friends. Even if you don't have something a specific goal in mind for the contact, please just say hi.
To contact Ciro publicly about any general subject that is not covered in a more specific GitHub repository, including saying hi or suggestions about his website either:
- create a GitHub issue at: github.com/cirosantilli/cirosantilli.github.io/issues/new or Giscus thread
- at mention Ciro's main Twitter account
For comments about China, first read:
and then create a GitHub issue at: github.com/cirosantilli/china-dictatorship/issues/new
Publicly viewable contact is preferred if possible to more effectively share Ciro's wisdom with the world.
But if you feel more comfortable with private contact, no problem, either:
- email: username
cirosantilliwith provider ProtonMail which has domain nameproton.me. Note that Ciro also controls the Gmail address with that same username, and keep in mind that dots are ignored in Gmail addresses. But ProtonMail preferred because why should we give our private minds to the CIA by default? Push notifications disabled. - Signal: username
cirosantilli.89signal.me/#eu/BuJjV0enXYTOnFFc1FZV5LFcWodL1a2Oy9VZ5uyQU7xrYxqw+npIcaHBqghWudrI. 89 is a reference to Ciro Santilli's birth year 1989. Push notifications enabled, but treat like email unless we are actively chatting back and forth.
For other less good methods that will also likely work, use direct messages of the following profiles from under Section "Accounts controlled by Ciro Santilli":Ciro's Twitter DMs are also open, but note that Ciro receives endless Chinese language SPAM there which Twitter is doing nothing to combat, so it's not as reliable.
- LinkedIn: www.linkedin.com/in/cirosantilli
- Reddit: www.reddit.com/user/cirosantilli
- Facebook: www.facebook.com/cirosantilli
- Telegram: telegram.me/cirosantilli. Note that end-to-end encryption is present on secret chats only, which don't have device sync. Ridiculous.
If you are a privacy freak or are going to tell Ciro state secrets Ciro has this GNU Privacy Guard public key: pubkey.gpg, but it's not something that he has ever really used.
Disqus comments were removed from his website in 2019-05-04, a manual dump is available here, removal rationale at: why Ciro Santilli removed Disqus comments from his website in 2019-05-04.
The Scanning Electron Microscope by MaterialsScience2000 (2014)
Source. Shows operation of the microscope really well. Seems too easy, there must have been some extra setup before however. Impressed by how fast the image update, it is basically instantaneous. Produced by Prof. Dr.-Ing. Rainer Schwab from the Karlsruhe University of Applied Sciences.Mosquito Eye Scanning Electron Microscope Zoom by Mathew Tizard (2005)
Source. Video description mentions is a composite video. Why can't you do it in one shot?It sees and moves individual atoms!!!
Transmission Electron Microscope by LD SEF (2019)
Source. Images some gold nanopraticles 5-10 nm. You can also get crystallographic information directly on the same machine.This technique has managed to determine protein 3D structures for proteins that people were not able to crystallize for X-ray crystallography.
It is said however that cryoEM is even fiddlier than X-ray crystallography, so it is mostly attempted if crystallization attempts fail.
We just put a gazillion copies of our molecule of interest in a solution, and then image all of them in the frozen water.
Each one of them appears in the image in a random rotated view, so given enough of those point of view images, we can deduce the entire 3D structure of the molecule.
Ciro Santilli once watched a talk by Richard Henderson about cryoEM circa 2020, where he mentioned that he witnessed some students in the 1980's going to Germany, and coming into contact with early cryoEM. And when they came back, they just told their principal investigator: "I'm going to drop my PhD theme and focus exclusively on cryoEM". That's how hot the cryo thing was! So cool.

How hard could it be? You just have to learn the encoding of the neural spine/eyes/ear, add an invasive device that multiplexes it, and then the benefits could be mind blowing.
Pinned article: Introduction to the OurBigBook Project
Welcome to the OurBigBook Project! Our goal is to create the perfect publishing platform for STEM subjects, and get university-level students to write the best free STEM tutorials ever.
Everyone is welcome to create an account and play with the site: ourbigbook.com/go/register. We belive that students themselves can write amazing tutorials, but teachers are welcome too. You can write about anything you want, it doesn't have to be STEM or even educational. Silly test content is very welcome and you won't be penalized in any way. Just keep it legal!
Intro to OurBigBook
. Source. We have two killer features:
- topics: topics group articles by different users with the same title, e.g. here is the topic for the "Fundamental Theorem of Calculus" ourbigbook.com/go/topic/fundamental-theorem-of-calculusArticles of different users are sorted by upvote within each article page. This feature is a bit like:
- a Wikipedia where each user can have their own version of each article
- a Q&A website like Stack Overflow, where multiple people can give their views on a given topic, and the best ones are sorted by upvote. Except you don't need to wait for someone to ask first, and any topic goes, no matter how narrow or broad
This feature makes it possible for readers to find better explanations of any topic created by other writers. And it allows writers to create an explanation in a place that readers might actually find it.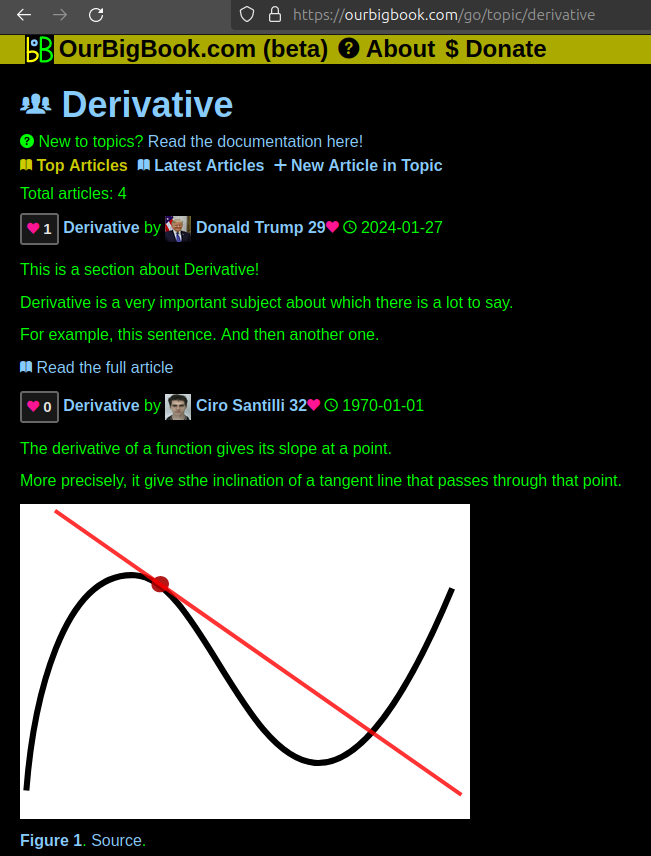
Figure 1. Screenshot of the "Derivative" topic page. View it live at: ourbigbook.com/go/topic/derivativeVideo 2. OurBigBook Web topics demo. Source. - local editing: you can store all your personal knowledge base content locally in a plaintext markup format that can be edited locally and published either:This way you can be sure that even if OurBigBook.com were to go down one day (which we have no plans to do as it is quite cheap to host!), your content will still be perfectly readable as a static site.
- to OurBigBook.com to get awesome multi-user features like topics and likes
- as HTML files to a static website, which you can host yourself for free on many external providers like GitHub Pages, and remain in full control
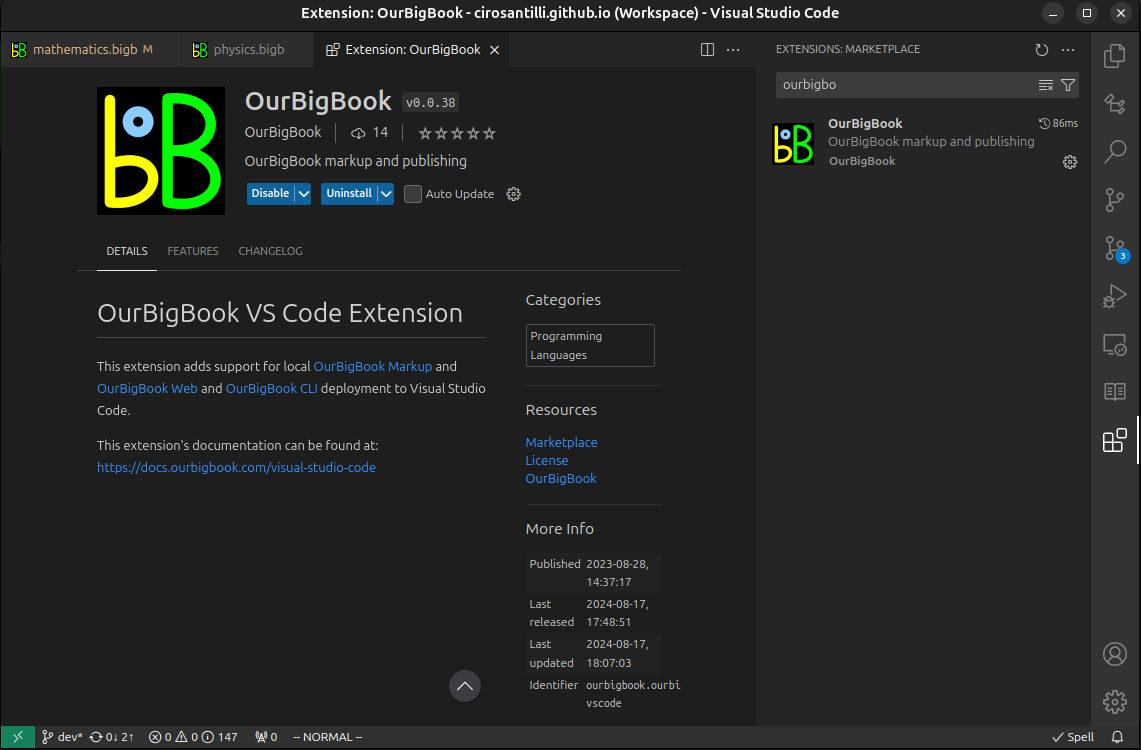
Figure 3. Visual Studio Code extension installation.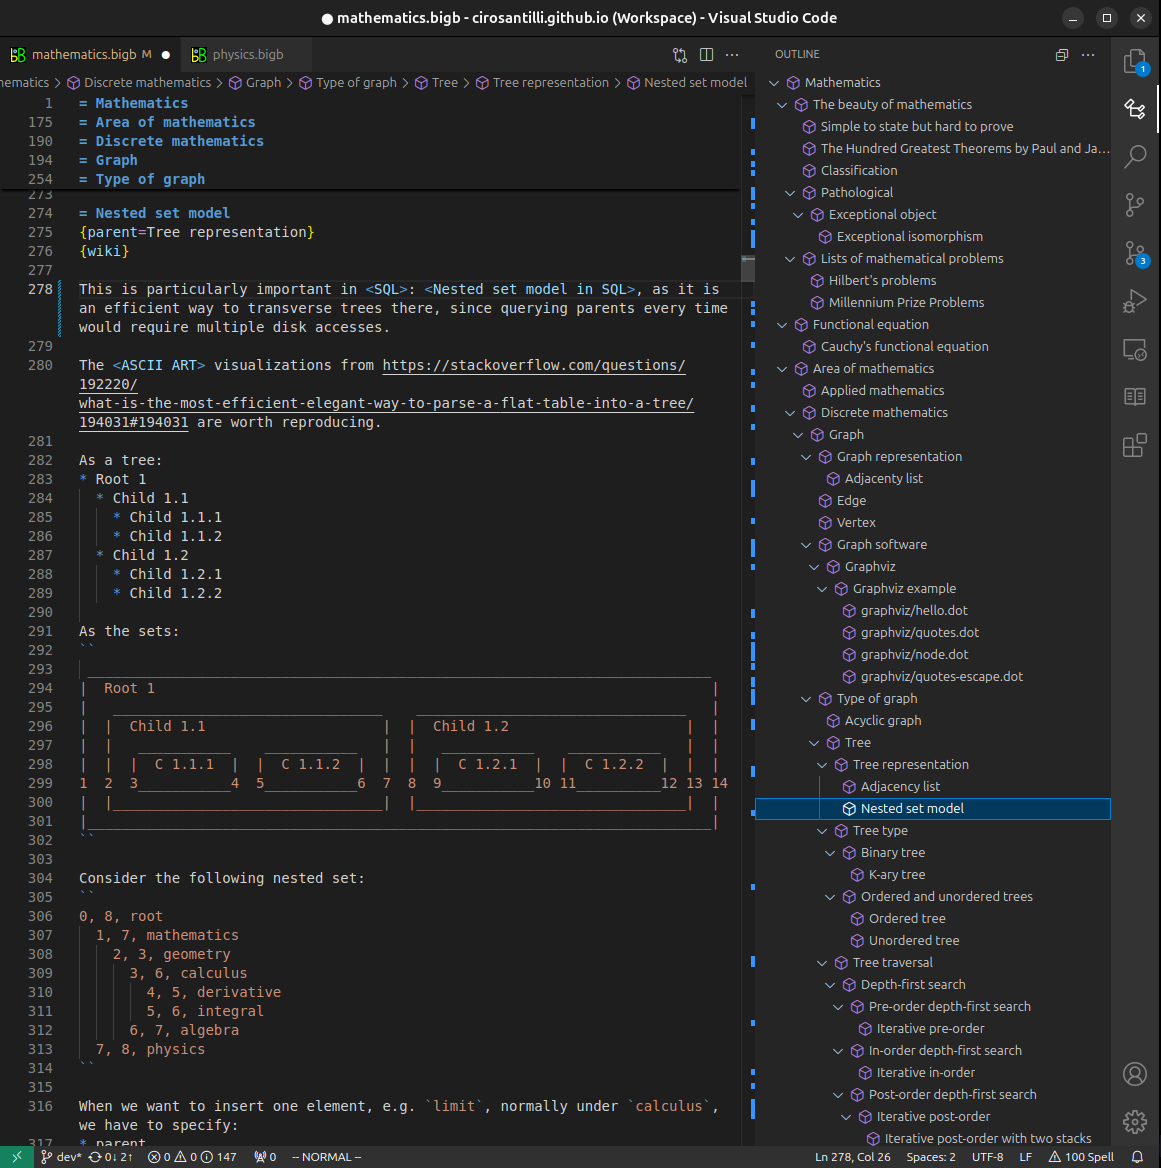
Figure 4. Visual Studio Code extension tree navigation.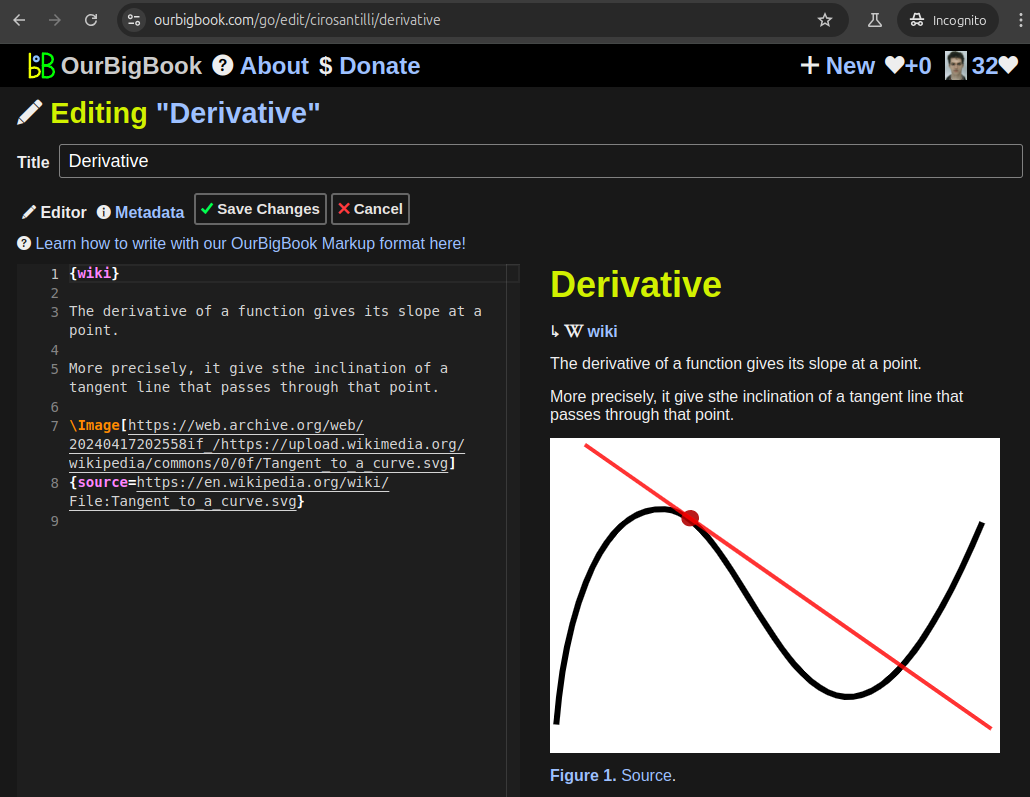
Figure 5. Web editor. You can also edit articles on the Web editor without installing anything locally.Video 3. Edit locally and publish demo. Source. This shows editing OurBigBook Markup and publishing it using the Visual Studio Code extension.Video 4. OurBigBook Visual Studio Code extension editing and navigation demo. Source. 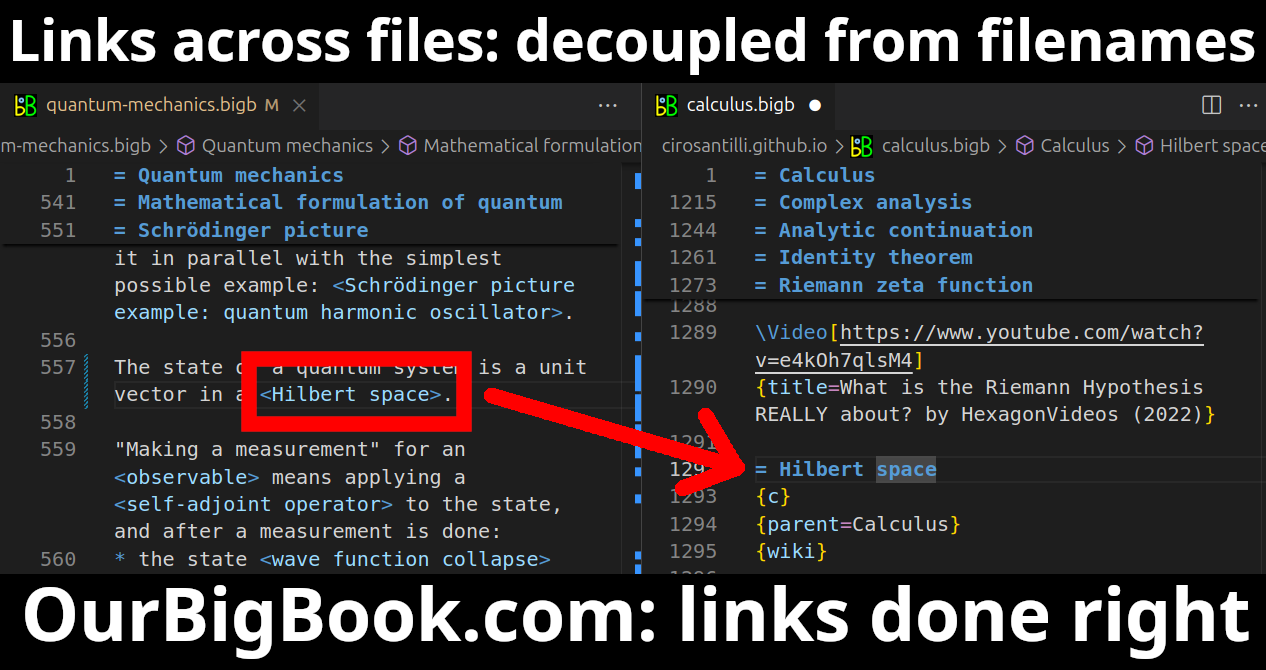
- Infinitely deep tables of contents:

All our software is open source and hosted at: github.com/ourbigbook/ourbigbook
Further documentation can be found at: docs.ourbigbook.com
Feel free to reach our to us for any help or suggestions: docs.ourbigbook.com/#contact