
Welcome to my home page!

A discursive unit of digital culture.

A pen and bistre drawing by Hieronymus Bosch.

The eggshell tree human creature was also featured in the right-hand panel of Bosch's triptych The Garden of Earthly Delights. This painted version was recreated by M. C. Escher in a lithograph titled "Hell", and by Kentaro Miura in chapter 306 of the manga Berserk.


Welcome to my home page!
Welcome to my home page!
Welcome to my home page!
my website is home.6t.lt
Welcome to my home page!
Welcome to my home page!
Paper: arxiv.org/html/2509.26076v1
Apparently also has human review as part of the process. Newbs. Just require Lean solutions and be done with it... They do address it in a section of the paper "Formal math benchmarks" but still meh. Review must be fully automated, none of that asking humans bullshit.
Required CharacteristicsRequires genuine insight: Not solvable by routine application of known algorithms
Example problem:
Welcome to my home page!
Welcome to my home page!
Powerful Love Spells Caster, Spiritual Healing, Black Magic Spells, Lucky And Wealthy Rituals €꧂+27672740459. by  babakagolo 0 2026-03-02
babakagolo 0 2026-03-02A Love Spell 111 can be defined as any type of ritual, spell, or work of magic that brings about love, lust, attraction, or endearment. Love Spells Magic to help you understand your relationship problems, find your soul mate and make them fall in love with you with the help of Baba Kagolo. Save your marriage from divorce & make your relationship stronger, fix trust issues & misunderstandings between two lovers and get back your lost lover in just 48 hours. Love spells to reverse a breakup & save your relationship. Lost love spells to get your ex lost love back permanently & bring back lost love.
Heal relationship problems using love spells to increase love between two people. Love spells to banish intimacy & communication problems in your relationship. Love spells to make someone fall in love with you, attract a new lover, stop your partner from cheating on you & love spells to prevent a divorce. Love spells carry enormous powers which are not to harm but to strengthen the bond and the love two people have, or rather had, with one another. Baba Kagolo is bound to be associated with a good intention of returning love completely. He uses herbs, candles, shells, flowers, talismans, bags, voodoo vases, and the most widely used voodoo dolls to perform love spells.
*Are you in a relationship that feels one-sided?
*Are you in a marriage that is failing? If that is the case, then cast my love spells that work fast.
*Do you want to strengthen your relationship?
*Do you want to make him love you more?
*Do you feel he or she is seeing others? Are you involved in a loveless relationship?
Return Lost lovers And Restore Broken Marriages Spells CALL @ +27672740459 How to Bring back Lost Love with immediate Guaranteed results IN DUBLIN- ALABAMA- BOSTON- TORONTO- PRETORIA by babakagolo 0 2026-02-28
babakagolo 0 2026-02-28The Bring Back lost lover Magic love spells will retrieve your ex-lover immediately. It will make the runaway wife or husband change their mind. They will remember all about your good qualities and forget about those negative moments that led to the separation. This spell has the power to destroy the side relationship and bring back your lover instantly. Even if the separation was caused by religious, political, cultural, Bad behaviours, man-stealing or family differences, it will harmonise the situation and inculcate love. Achieve Long Lasting Marriage Using My Voodoo Marriage Love Spells. How are solid ships built? With good courtships. Although the bride and groom are 55 years old, in good financial condition and excellent professionals, it is essential not to miss a good courtship. Some people know each other and barely a month and a half and want to get married. That is a mistake: you must marry if you have passed the test of courtship. Because the process of maturation of love has a necessary sequence, and thanks to courtship, we avoid confusing what the imagination produces as an effect of love. The courtship makes it possible, on the other hand, to meet the reality of the other person. If you would like to ensure a smooth process of courtship, cast my powerful marriage love spells, and it will happen. SPELL CASTER IS here to bring back hope to those who have been disappointed by fake sangomas. Whatever situation you passed through, there has been a reason, so that one day you can be a testimony to those who go through such a situation and bring hope to their lives. So those that need help with problems such as: Financial problems, manhood problems, relationship, marriage and love problems, evil spirits at home, bad luck, court and divorce cases, bring back lost lovers or relatives and many more contact Baba Kagolo, he uses both the powers of his ancestors and prayers to solve people’s problems and to tell you your future. Are you trying to bring back your lost love or reunite with your Ex-lover but still failing in Cyprus, Botswana, Zambia, Pretoria, or Johannesburg? Are you missing the old times with your loved one, and is it a harsh reality that you cannot forget them? Are you in love with someone who doesn’t love you back? Are you hunting for him/her? Now it is the reality, who doesn’t want this kind of life? Get married to the love of your life & seal your marriage with everlasting happiness. Bring back your Lost lover in 2 -4 days with my powerful love spells. My magical love spells will do wonders in your life and change everything in 3 days. Solve Wife-husband Problems, fix Marriage and Relationship problems. Want to know about your love situation?, to bring back your man?, want to see who cheats on your husband/wife?, to restore original love in your relationship? Want to bind you with your partner?, want to divorce?, break up a relationship?, and all marriage and relationship matters plus life issues like removing bad luck, boosting your business?, checking your future, and many more +27672740459 incredible temple and leave when all your problems are solved!!!!!!!!
Pinned article: Introduction to the OurBigBook Project
Welcome to the OurBigBook Project! Our goal is to create the perfect publishing platform for STEM subjects, and get university-level students to write the best free STEM tutorials ever.
Everyone is welcome to create an account and play with the site: ourbigbook.com/go/register. We belive that students themselves can write amazing tutorials, but teachers are welcome too. You can write about anything you want, it doesn't have to be STEM or even educational. Silly test content is very welcome and you won't be penalized in any way. Just keep it legal!
Intro to OurBigBook
. Source. We have two killer features:
- topics: topics group articles by different users with the same title, e.g. here is the topic for the "Fundamental Theorem of Calculus" ourbigbook.com/go/topic/fundamental-theorem-of-calculusArticles of different users are sorted by upvote within each article page. This feature is a bit like:
- a Wikipedia where each user can have their own version of each article
- a Q&A website like Stack Overflow, where multiple people can give their views on a given topic, and the best ones are sorted by upvote. Except you don't need to wait for someone to ask first, and any topic goes, no matter how narrow or broad
This feature makes it possible for readers to find better explanations of any topic created by other writers. And it allows writers to create an explanation in a place that readers might actually find it.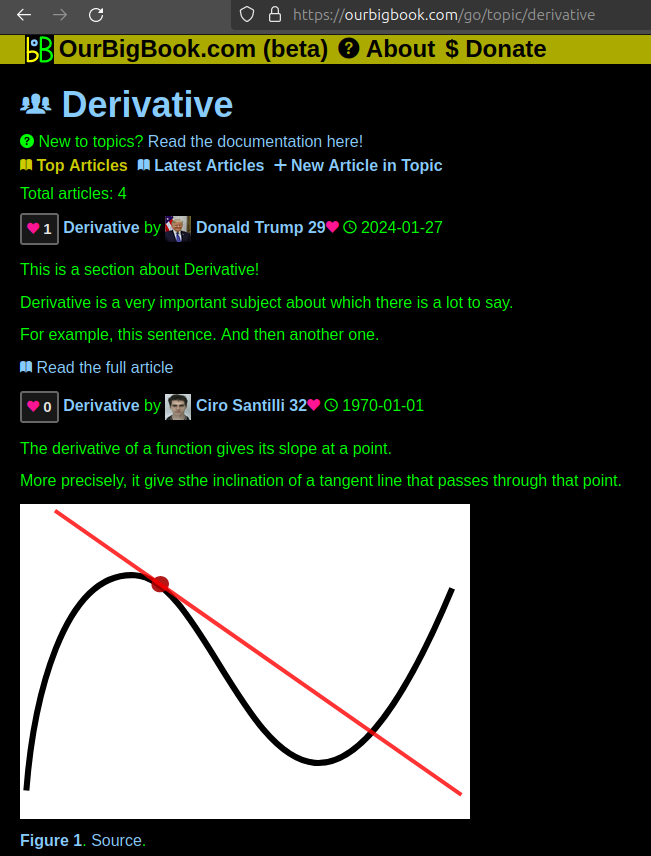
Figure 1. Screenshot of the "Derivative" topic page. View it live at: ourbigbook.com/go/topic/derivativeVideo 2. OurBigBook Web topics demo. Source. - local editing: you can store all your personal knowledge base content locally in a plaintext markup format that can be edited locally and published either:This way you can be sure that even if OurBigBook.com were to go down one day (which we have no plans to do as it is quite cheap to host!), your content will still be perfectly readable as a static site.
- to OurBigBook.com to get awesome multi-user features like topics and likes
- as HTML files to a static website, which you can host yourself for free on many external providers like GitHub Pages, and remain in full control

Figure 3. Visual Studio Code extension installation.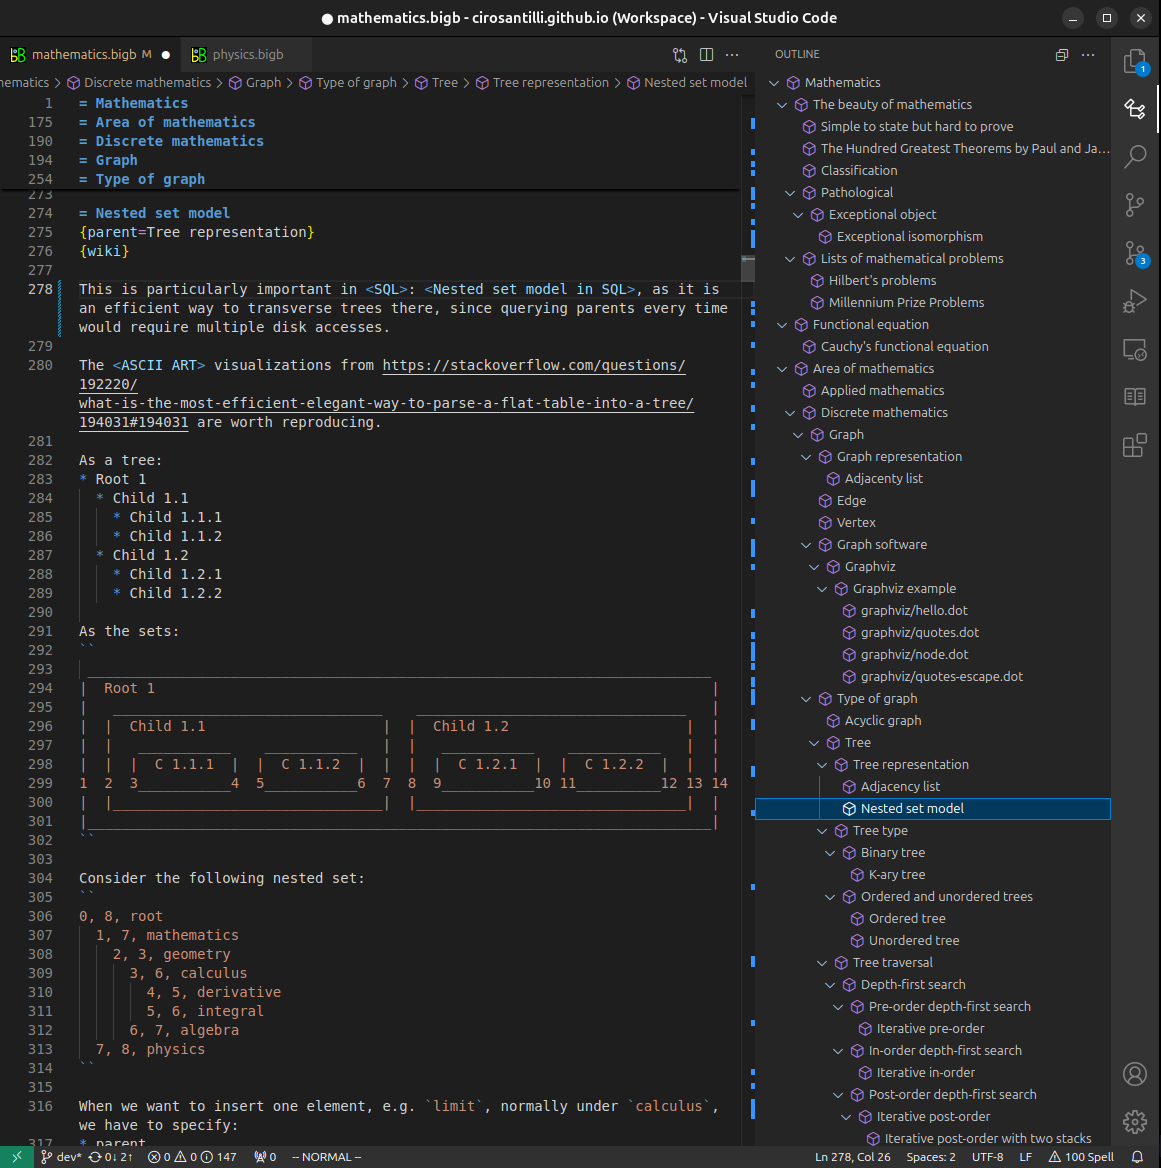
Figure 4. Visual Studio Code extension tree navigation.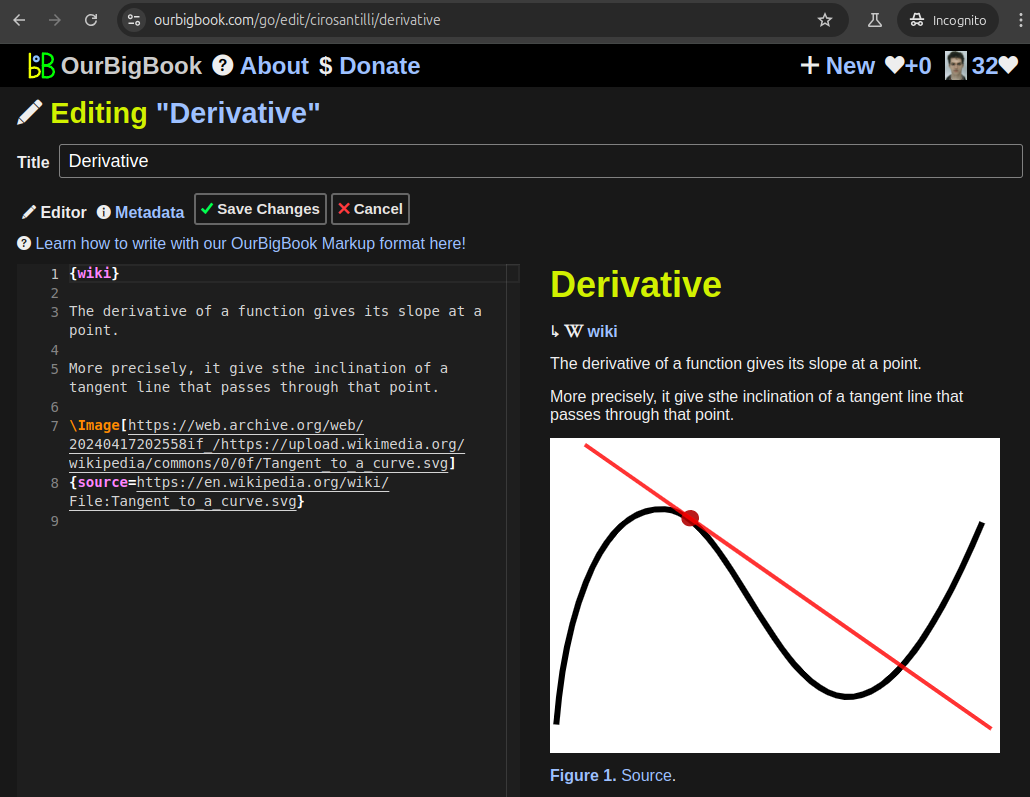
Figure 5. Web editor. You can also edit articles on the Web editor without installing anything locally.Video 3. Edit locally and publish demo. Source. This shows editing OurBigBook Markup and publishing it using the Visual Studio Code extension.Video 4. OurBigBook Visual Studio Code extension editing and navigation demo. Source. 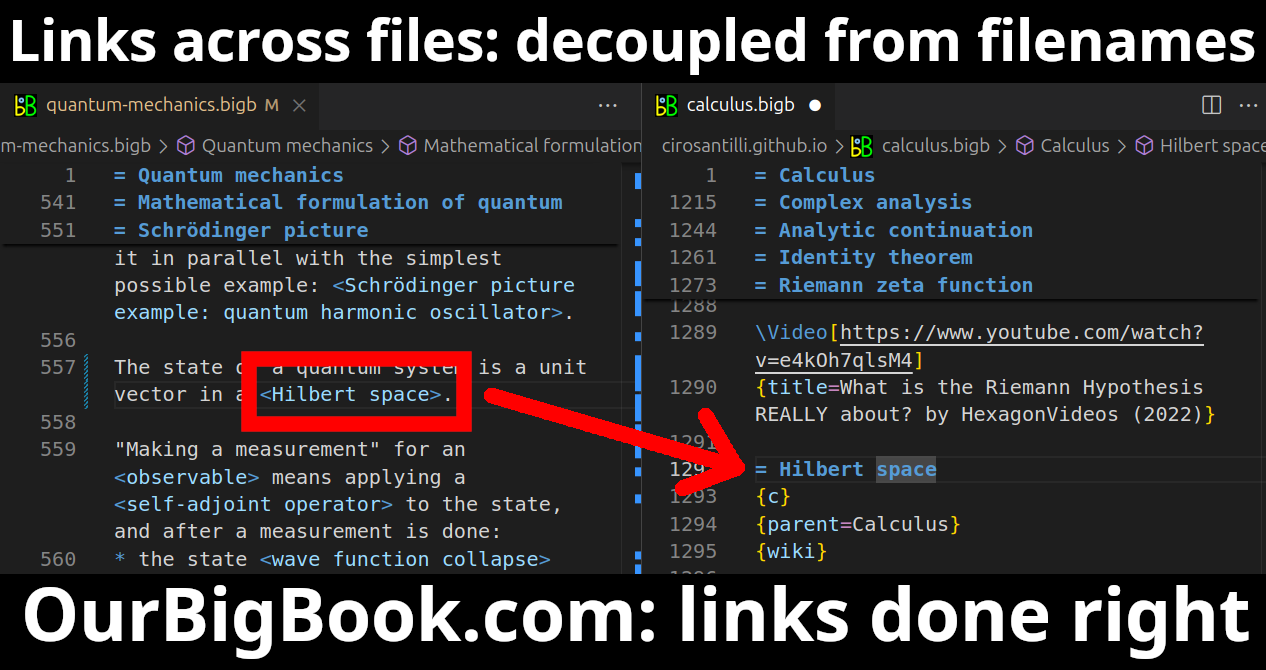
- Infinitely deep tables of contents:

All our software is open source and hosted at: github.com/ourbigbook/ourbigbook
Further documentation can be found at: docs.ourbigbook.com
Feel free to reach our to us for any help or suggestions: docs.ourbigbook.com/#contact