Interesting layer skip architecture thing.
Apparently destroyed ImageNet 2015 and became very very famous as such.

- torchvision ResNet
- MLperf v2.1 ResNet contains a pre-trained ResNet ONNX at zenodo.org/record/4735647/files/resnet50_v1.onnx for its inference benchmark. We've tested it at: Run MLperf v2.1 ResNet on Imagenette.
catalog.ngc.nvidia.com/orgs/nvidia/resources/resnet_50_v1_5_for_pytorch explains:
The difference between v1 and v1.5 is that, in the bottleneck blocks which requires downsampling, v1 has stride = 2 in the first 1x1 convolution, whereas v1.5 has stride = 2 in the 3x3 convolution.This difference makes ResNet50 v1.5 slightly more accurate (~0.5% top1) than v1, but comes with a small performance drawback (~5% imgs/sec).
CNN convolution kernels are not hardcoded. They are learnt and optimized via backpropagation. You just specify their size! Example in PyTorch you'd do just:as used for example at: activatedgeek/LeNet-5.
nn.Conv2d(1, 6, kernel_size=(5, 5))This can also be inferred from: stackoverflow.com/questions/55594969/how-to-visualise-filters-in-a-cnn-with-pytorch where we see that the kernels are not perfectly regular as you'd expected from something hand coded.

It trains the LeNet-5 neural network on the MNIST dataset from scratch, and afterwards you can give it newly hand-written digits 0 to 9 and it will hopefully recognize the digit for you.
Ciro Santilli created a small fork of this repo at lenet adding better automation for:
- extracting MNIST images as PNG
- ONNX CLI inference taking any image files as input
- a Python
tkinterGUI that lets you draw and see inference live - running on GPU
Install on Ubuntu 24.10 with:We use our own
sudo apt install protobuf-compiler
git clone https://github.com/activatedgeek/LeNet-5
cd LeNet-5
git checkout 95b55a838f9d90536fd3b303cede12cf8b5da47f
virtualenv -p python3 .venv
. .venv/bin/activate
pip install \
  Pillow==6.2.0 \
  numpy==1.24.2 \
  onnx==1.13.1 \
  torch==2.0.0 \
  torchvision==0.15.1 \
  visdom==0.2.4 \
;pip install because their requirements.txt uses >= instead of == making it random if things will work or not.On Ubuntu 22.10 it was instead:
pip install
  Pillow==6.2.0 \
  numpy==1.26.4 \
  onnx==1.17.0 torch==2.6.0 \
  torchvision==0.21.0 \
  visdom==0.2.4 \
;
Then run with:This script:
python run.pyIt throws a billion exceptions because we didn't start the Visdom server, but everything works nevertheless, we just don't get a visualization of the training.
The terminal outputs lines such as:
Train - Epoch 1, Batch: 0, Loss: 2.311587
Train - Epoch 1, Batch: 10, Loss: 2.067062
Train - Epoch 1, Batch: 20, Loss: 0.959845
...
Train - Epoch 1, Batch: 230, Loss: 0.071796
Test Avg. Loss: 0.000112, Accuracy: 0.967500
...
Train - Epoch 15, Batch: 230, Loss: 0.010040
Test Avg. Loss: 0.000038, Accuracy: 0.989300One of the benefits of the ONNX output is that we can nicely visualize the neural network on Netron:

output = self.c1(img)
x = self.c2_1(output)
output = self.c2_2(output)
output += x
output = self.c3(output)
Note that:
- the images must be drawn with white on black. If you use black on white, it the accuracy becomes terrible. This is a good very example of brittleness in AI systems!
- images must be converted to 32x32 for
lenet.onnx, as that is what training was done on. The training step converted the 28x28 images to 32x32 as the first thing it does before training even starts
We can try the code adapted from thenewstack.io/tutorial-using-a-pre-trained-onnx-model-for-inferencing/ at lenet/infer.py:and it works pretty well! The program outputs:as desired.
cd lenet
cp ~/git/LeNet-5/lenet.onnx .
wget -O 9.png https://raw.githubusercontent.com/cirosantilli/media/master/Digit_9_hand_drawn_by_Ciro_Santilli_on_GIMP_with_mouse_white_on_black.png
./infer.py 9.png9We can also try with images directly from Extract MNIST images.and the accuracy is great as expected.
infer_mnist.py lenet.onnx mnist_png/out/testing/1/*.pngBy default, the setup runs on CPU only, not GPU, as could be seen by running htop. But by the magic of PyTorch, modifying the program to run on the GPU is trivial:and leads to a faster runtime, with less
cat << EOF | patch
diff --git a/run.py b/run.py
index 104d363..20072d1 100644
--- a/run.py
+++ b/run.py
@@ -24,7 +24,8 @@ data_test = MNIST('./data/mnist',
 data_train_loader = DataLoader(data_train, batch_size=256, shuffle=True, num_workers=8)
 data_test_loader = DataLoader(data_test, batch_size=1024, num_workers=8)

-net = LeNet5()
+device = 'cuda'
+net = LeNet5().to(device)
 criterion = nn.CrossEntropyLoss()
 optimizer = optim.Adam(net.parameters(), lr=2e-3)

@@ -43,6 +44,8 @@ def train(epoch):
     net.train()
     loss_list, batch_list = [], []
     for i, (images, labels) in enumerate(data_train_loader):
+        labels = labels.to(device)
+        images = images.to(device)
         optimizer.zero_grad()

         output = net(images)
@@ -71,6 +74,8 @@ def test():
     total_correct = 0
     avg_loss = 0.0
     for i, (images, labels) in enumerate(data_test_loader):
+        labels = labels.to(device)
+        images = images.to(device)
         output = net(images)
         avg_loss += criterion(output, labels).sum()
         pred = output.detach().max(1)[1]
@@ -84,7 +89,7 @@ def train_and_test(epoch):
     train(epoch)
     test()

-    dummy_input = torch.randn(1, 1, 32, 32, requires_grad=True)
+    dummy_input = torch.randn(1, 1, 32, 32, requires_grad=True).to(device)
     torch.onnx.export(net, dummy_input, "lenet.onnx")

     onnx_model = onnx.load("lenet.onnx")
EOFuser as now we are spending more time on the GPU than CPU:real 1m27.829s
user 4m37.266s
sys 0m27.562sThis is a small fork of activatedgeek/LeNet-5 by Ciro Santilli adding better integration and automation for:
Install on Ubuntu 24.10:
sudo apt install protobuf-compiler
cd lenet
virtualenv -p python3 .venv
. .venv/bin/activate
pip install -r requirements-python-3-12.txt
Download and extract MNIST train, test accuracy, and generate the ONNX Extract MNIST images as PNG:Infer some individual images using the ONNX:Draw on a GUI and see live inference using the ONNX:TODO: the following are missing for this to work:
lenet.onnx:./train.py./extract_pngs.py./infer.py data/MNIST/png/test/0/*.png./draw.py- start a background task. This we know how to do: stackoverflow.com/questions/1198262/tkinter-locks-python-when-an-icon-is-loaded-and-tk-mainloop-is-in-a-thread/79502287#79502287
- get bytes from the canvas: all methods are ugly: stackoverflow.com/questions/9886274/how-can-i-convert-canvas-content-to-an-image
Became notable for performing extremely well on ImageNet starting in 2012.
It is also notable for being one of the first to make successful use of GPU training rather than GPU training.
You can get some really sweet pre-trained versions of this, typically trained on the COCO dataset.
It is a bit of an unfortunate as it suggests something like "deep understanding" and even reminds one of AGI, which it almost certainly will not attain on its own. But at least it sounds good.
What is backpropagation really doing? by 3Blue1Brown (2017)
Source. Good hand-wave intuition, but does not describe the exact algorithm.mlcommons.org/en/ Their homepage is not amazingly organized, but it does the job.
Benchmark focused on deep learning. It has two parts:Furthermore, a specific network model is specified for each benchmark in the closed category: so it goes beyond just specifying the dataset.
Results can be seen e.g. at:
Those URLs broke as of 2025 of course, now you have to click on their Tableau down to the 2.1 round and there's no fixed URL for it:
And there are also separate repositories for each:
Instructions at:
Ubuntu 22.10 setup with tiny dummy manually generated ImageNet and run on ONNX:
sudo apt install pybind11-dev

git clone https://github.com/mlcommons/inference
cd inference
git checkout v2.1

virtualenv -p python3 .venv
. .venv/bin/activate
pip install numpy==1.24.2 pycocotools==2.0.6 onnxruntime==1.14.1 opencv-python==4.7.0.72 torch==1.13.1

cd loadgen
CFLAGS="-std=c++14" python setup.py develop
cd -

cd vision/classification_and_detection
python setup.py develop
wget -q https://zenodo.org/record/3157894/files/mobilenet_v1_1.0_224.onnx
export MODEL_DIR="$(pwd)"
export EXTRA_OPS='--time 10 --max-latency 0.2'

tools/make_fake_imagenet.sh
DATA_DIR="$(pwd)/fake_imagenet" ./run_local.sh onnxruntime mobilenet cpu --accuracy
Last line of output on P51, which appears to contain the benchmark resultswhere presumably
TestScenario.SingleStream qps=58.85, mean=0.0138, time=0.136, acc=62.500%, queries=8, tiles=50.0:0.0129,80.0:0.0137,90.0:0.0155,95.0:0.0171,99.0:0.0184,99.9:0.0187qps means queries per second, and is the main results we are interested in, the more the better.Running:produces a tiny ImageNet subset with 8 images under
tools/make_fake_imagenet.shfake_imagenet/.fake_imagenet/val_map.txt contains:val/800px-Porsche_991_silver_IAA.jpg 817
val/512px-Cacatua_moluccensis_-Cincinnati_Zoo-8a.jpg 89
val/800px-Sardinian_Warbler.jpg 13
val/800px-7weeks_old.JPG 207
val/800px-20180630_Tesla_Model_S_70D_2015_midnight_blue_left_front.jpg 817
val/800px-Welsh_Springer_Spaniel.jpg 156
val/800px-Jammlich_crop.jpg 233
val/782px-Pumiforme.JPG 285TODO prepare and test on the actual ImageNet validation set, README says:
Prepare the imagenet dataset to come.
Since that one is undocumented, let's try the COCO dataset instead, which uses COCO 2017 and is also a bit smaller. Note that his is not part of MLperf anymore since v2.1, only ImageNet and open images are used. But still:
wget https://zenodo.org/record/4735652/files/ssd_mobilenet_v1_coco_2018_01_28.onnx
DATA_DIR_BASE=/mnt/data/coco
export DATA_DIR="${DATADIR_BASE}/val2017-300"
mkdir -p "$DATA_DIR_BASE"
cd "$DATA_DIR_BASE"
wget http://images.cocodataset.org/zips/val2017.zip
wget http://images.cocodataset.org/annotations/annotations_trainval2017.zip
unzip val2017.zip
unzip annotations_trainval2017.zip
mv annotations val2017
cd -
cd "$(git-toplevel)"
python tools/upscale_coco/upscale_coco.py --inputs "$DATA_DIR_BASE" --outputs "$DATA_DIR" --size 300 300 --format png
cd -Now:fails immediately with:The more plausible looking:first takes a while to preprocess something most likely, which it does only one, and then fails:
./run_local.sh onnxruntime mobilenet cpu --accuracyNo such file or directory: '/path/to/coco/val2017-300/val_map.txt./run_local.sh onnxruntime mobilenet cpu --accuracy --dataset coco-300Traceback (most recent call last):
File "/home/ciro/git/inference/vision/classification_and_detection/python/main.py", line 596, in <module>
main()
File "/home/ciro/git/inference/vision/classification_and_detection/python/main.py", line 468, in main
ds = wanted_dataset(data_path=args.dataset_path,
File "/home/ciro/git/inference/vision/classification_and_detection/python/coco.py", line 115, in __init__
self.label_list = np.array(self.label_list)
ValueError: setting an array element with a sequence. The requested array has an inhomogeneous shape after 2 dimensions. The detected shape was (5000, 2) + inhomogeneous part.TODO!
Next, in the and then let's create the then back on the mlperf directory we download our model:and finally run!which gives on P51:where The
imagenette2 directory, first let's create a 224x224 scaled version of the inputs as required by the benchmark at mlcommons.org/en/inference-datacenter-21/:#!/usr/bin/env bash
rm -rf val224x224
mkdir -p val224x224
for syndir in val/*: do
syn="$(dirname $syndir)"
for img in "$syndir"/*; do
convert "$img" -resize 224x224 "val224x224/$syn/$(basename "$img")"
done
doneval_map.txt file to match the format expected by MLPerf:#!/usr/bin/env bash
wget https://gist.githubusercontent.com/aaronpolhamus/964a4411c0906315deb9f4a3723aac57/raw/aa66dd9dbf6b56649fa3fab83659b2acbf3cbfd1/map_clsloc.txt
i=0
rm -f val_map.txt
while IFS="" read -r p || [ -n "$p" ]; do
synset="$(printf '%s\n' "$p" | cut -d ' ' -f1)"
if [ -d "val224x224/$synset" ]; then
for f in "val224x224/$synset/"*; do
echo "$f $i" >> val_map.txt
done
fi
i=$((i + 1))
done < <( sort map_clsloc.txt )wget https://zenodo.org/record/4735647/files/resnet50_v1.onnxDATA_DIR=/mnt/sda3/data/imagenet/imagenette2 time ./run_local.sh onnxruntime resnet50 cpu --accuracyTestScenario.SingleStream qps=164.06, mean=0.0267, time=23.924, acc=87.134%, queries=3925, tiles=50.0:0.0264,80.0:0.0275,90.0:0.0287,95.0:0.0306,99.0:0.0401,99.9:0.0464qps presumably means "querries per second". And the time results:446.78user 33.97system 2:47.51elapsed 286%CPU (0avgtext+0avgdata 964728maxresident)ktime=23.924 is much smaller than the time executable because of some lengthy pre-loading (TODO not sure what that means) that gets done every time:INFO:imagenet:loaded 3925 images, cache=0, took=52.6sec
INFO:main:starting TestScenario.SingleStreamLet's try on the GPU now:which gives:TODO lower
DATA_DIR=/mnt/sda3/data/imagenet/imagenette2 time ./run_local.sh onnxruntime resnet50 gpu --accuracyTestScenario.SingleStream qps=130.91, mean=0.0287, time=29.983, acc=90.395%, queries=3925, tiles=50.0:0.0265,80.0:0.0285,90.0:0.0405,95.0:0.0425,99.0:0.0490,99.9:0.0512
455.00user 4.96system 1:59.43elapsed 385%CPU (0avgtext+0avgdata 975080maxresident)kqps on GPU!Notably, convolution can be implemented in terms of GEMM:
The most important thing this project provides appears to be the
.onnx file format, which represents ANN models, pre-trained or not.Deep learning frameworks can then output such
.onnx files for interchangeability and serialization.Some examples:
- activatedgeek/LeNet-5 produces a trained
.onnxfrom PyTorch - MLperf v2.1 ResNet can use
.onnxas a pre-trained model
The cool thing is that ONNX can then run inference in an uniform manner on a variety of devices without installing the deep learning framework used for. It's a bit like having a kind of portable executable. Neat.
ONNX visualizer.
Matrix multiplication example.
Fundamental since deep learning is mostly matrix multiplication.
NumPy does not automatically use the GPU for it: stackoverflow.com/questions/49605231/does-numpy-automatically-detect-and-use-gpu, and PyTorch is one of the most notable compatible implementations, as it uses the same memory structure as NumPy arrays.
Sample runs on P51 to observe the GPU speedup:
$ time ./matmul.py g 10000 1000 10000 100
real    0m22.980s
user    0m22.679s
sys     0m1.129s
$ time ./matmul.py c 10000 1000 10000 100
real    1m9.924s
user    4m16.213s
sys 0m17.293sContains several computer vision models, e.g. ResNet, all of them including pre-trained versions on some dataset, which is quite sweet.
Documentation: pytorch.org/vision/stable/index.html
pytorch.org/vision/0.13/models.html has a minimal runnable example adapted to python/pytorch/resnet_demo.py.
That example uses a ResNet pre-trained on the COCO dataset to do some inference, tested on Ubuntu 22.10:This first downloads the model, which is currently 167 MB.
cd python/pytorch
wget -O resnet_demo_in.jpg https://upload.wikimedia.org/wikipedia/commons/thumb/6/60/Rooster_portrait2.jpg/400px-Rooster_portrait2.jpg
./resnet_demo.py resnet_demo_in.jpg resnet_demo_out.jpgWe know it is COCO because of the docs: pytorch.org/vision/0.13/models/generated/torchvision.models.detection.fasterrcnn_resnet50_fpn_v2.html which explains that is an alias for:
FasterRCNN_ResNet50_FPN_V2_Weights.DEFAULTFasterRCNN_ResNet50_FPN_V2_Weights.COCO_V1After it finishes, the program prints the recognized classes:so we get the expected
['bird', 'banana']bird, but also the more intriguing banana.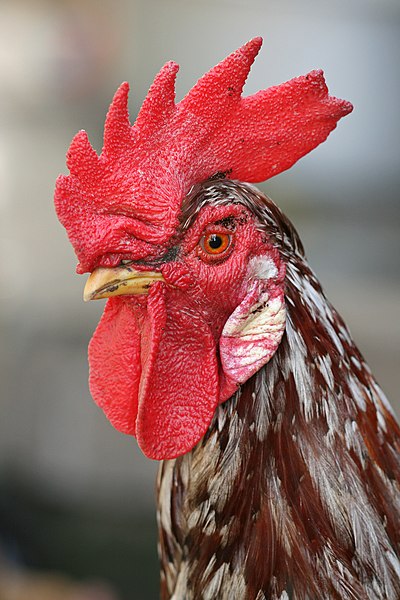

Version of TensorFlow with a Cirq backend that can run in either quantum computers or classical computer simulations, with the goal of potentially speeding up deep learning applications on a quantum computer some day.
Articles by others on the same topic
An Artificial Neural Network (ANN) is a computational model inspired by the way biological neural networks in the human brain process information. ANNs are a core component of machine learning and artificial intelligence, particularly in the field of deep learning. Key components of an ANN include: 1. **Neurons**: The basic unit of an ANN, analogous to biological neurons. Each neuron receives input, processes it, and produces an output.