The Optional Prisoner's Dilemma is a variation of the classic Prisoner's Dilemma, a standard problem in game theory. In the traditional Prisoner's Dilemma, two players can either cooperate or defect, with the optimal strategy for both players being to defect, given that each player anticipates the other’s temptation to defect. The dilemma illustrates a situation where individual rationality leads to a worse collective outcome.
"Costa Rican physicists" refers to scientists from Costa Rica who specialize in the field of physics. Physics is a fundamental branch of science that studies matter, energy, and the interactions between them. Costa Rica has a growing community of physicists who are involved in various fields of research, including theoretical physics, experimental physics, and applied physics. In recent years, Costa Rica has made efforts to enhance its scientific education and research capabilities, which includes improving the training and development of physicists.
Fission product yield refers to the distribution and amounts of various isotopes produced when a heavy nucleus undergoes fission, typically in nuclear reactors or during the detonation of nuclear weapons. When a heavy nucleus, such as uranium-235 or plutonium-239, splits into smaller nuclei (the fission products), it releases a significant amount of energy as well as a variety of different isotopes.
As of my last knowledge update in October 2021, Norway does not have a nuclear power program for electricity generation. The country relies primarily on hydropower, which accounts for a significant majority of its electricity production. Other energy sources in Norway include wind power, natural gas, and some fossil fuels, but nuclear energy has not been part of Norway's energy mix.
A reference genome is a digital DNA sequence that represents the typical genome of a species, serving as a standard against which individual genomes can be compared. It is an assembled sequence that contains the complete set of genes and genomic regions, providing a framework for researchers to analyze genetic variations, such as single nucleotide polymorphisms (SNPs), insertions, deletions, and structural variations.
Gradient Enhanced Nuclear Magnetic Resonance (NMR) Spectroscopy is an advanced technique that enhances the sensitivity and resolution of NMR experiments by using magnetic field gradients. In NMR, the signals are generated from nuclei in magnetic fields, and the resulting spectra can be influenced by various factors, including the homogeneity of the magnetic field and the number of spins contributing to the signal.
Jemris (Java-based Environment for the Manipulation of RIs) is a simulation software designed to model and simulate magnetic resonance experiments, particularly in the context of nuclear magnetic resonance (NMR) and magnetic resonance imaging (MRI). It provides a flexible environment for researchers and developers to simulate various magnetic field configurations and pulse sequences, enabling them to study the behavior of spins in magnetic fields. Jemris is useful for understanding complex magnetic resonance phenomena, optimizing experimental setups, and investigating new pulse sequences.
Oriol Bohigas Martí is a prominent Spanish architect, urban planner, and educator, known for his significant contributions to architecture and urban design, particularly in Barcelona. He played a crucial role in the urban renewal of Barcelona during the late 20th century, especially in the context of the 1992 Olympic Games, which provided a platform for extensive urban development and improvements in the city.
Nuclear power in Italy has a complex history. Italy was one of the early countries to develop nuclear power. The country built its first nuclear power plant, the Caorso Nuclear Power Plant, in the 1960s. At its peak, Italy had several nuclear reactors generating electricity, contributing a significant portion of the country's energy supply. However, the nuclear energy sector faced significant challenges, particularly after the Chernobyl disaster in 1986.
Neutron sources are devices or materials that produce neutrons. Neutrons are neutral subatomic particles, and their production is important in various fields, including nuclear physics, nuclear medicine, materials science, and radiation therapy. There are several primary types of neutron sources: 1. **Radioactive Neutron Sources**: These utilize radioactive materials that emit neutrons as part of their decay process.
The term "critical mass" can have different meanings depending on the context in which it is used: 1. **Physics/Nuclear Chemistry**: In the context of nuclear physics, "critical mass" refers to the minimum amount of fissile material (such as uranium-235 or plutonium-239) needed to maintain a nuclear chain reaction. If the amount of material is less than the critical mass, the reaction will fizzle out.
Brazil has a number of companies and organizations engaged in nuclear technology, primarily focused on the development of nuclear energy, research, and medical applications. Some of the key entities in this field include: 1. **Furnas Centrais Elétricas S.A.** - A major Brazilian electric utility company that operates several hydroelectric plants and is also involved in nuclear energy, particularly concerning its role in Brazil's energy matrix.
Chalk River Laboratories (CRL) is a Canadian research facility located in Chalk River, Ontario. It is operated by Canadian Nuclear Laboratories (CNL) and plays a crucial role in nuclear research, technology development, and engineering. Established in 1944, CRL has been significant in various areas, including nuclear science, radiation research, and the development of various nuclear technologies. The facility is known for its research in nuclear reactor physics, materials science, and safety.
The Chinese Nuclear Society (CNS) is a professional organization in China that focuses on the development and promotion of nuclear science and technology. Established in 1979, the society serves as a platform for professionals, scholars, and industry experts in the nuclear field to share knowledge, conduct research, and foster collaboration. CNS aims to advance the understanding and application of nuclear technology in various areas, including nuclear energy, medical applications, and radiation safety.
A Hot Laboratory and Waste Management Center is a specialized facility primarily focused on the safe handling, management, and disposal of radioactive materials and waste. These centers are critical in the fields of nuclear science, radiology, and other industries that utilize radioactive isotopes for medical, research, or industrial purposes. ### Key Functions: 1. **Hot Laboratory:** - **Handling Radioactive Materials:** Hot laboratories are equipped with shielding and containment systems to safely handle radioactive substances.
Japanese anti-nuclear weapons activists are individuals and organizations in Japan that advocate for the abolition of nuclear weapons and promote disarmament. This movement stems from Japan's unique historical context as the only country to have suffered nuclear bombings in warfare, specifically the bombings of Hiroshima and Nagasaki in August 1945 during World War II. The catastrophic impact of these events has profoundly shaped public consciousness in Japan regarding nuclear weapons and their consequences.
Wendelstein 7-AS is a stellarator, which is a type of magnetic confinement device used in nuclear fusion research. Located in Germany at the Max Planck Institute for Plasma Physics, it serves as a test facility for the development and optimization of stellarator technologies. The name "Wendelstein" reflects the facility's location in the Wendelstein mountain region, and "7-AS" indicates that it is the seventh stellarator design in the series.
Friedrich Tinner is not widely recognized in mainstream discourse, so it's possible that you might be referring to a lesser-known individual, a specific character from a story, or perhaps a context that hasn't garnered significant attention. There is also a Friedrich Tinner associated with historical contexts like the 19th century, but limited information is available on specific contributions or significance.
The term "National Defence Complex" can refer to various military or defense-related facilities or projects in different countries. However, one prominent example is the **National Defence Complex (NDC)** in South Korea. Established to streamline and enhance the nation's defense capabilities, the NDC encompasses various aspects of defense policy, research, development, and production of military equipment.
Pinned article: Introduction to the OurBigBook Project
Welcome to the OurBigBook Project! Our goal is to create the perfect publishing platform for STEM subjects, and get university-level students to write the best free STEM tutorials ever.
Everyone is welcome to create an account and play with the site: ourbigbook.com/go/register. We belive that students themselves can write amazing tutorials, but teachers are welcome too. You can write about anything you want, it doesn't have to be STEM or even educational. Silly test content is very welcome and you won't be penalized in any way. Just keep it legal!
Intro to OurBigBook
. Source. We have two killer features:
- topics: topics group articles by different users with the same title, e.g. here is the topic for the "Fundamental Theorem of Calculus" ourbigbook.com/go/topic/fundamental-theorem-of-calculusArticles of different users are sorted by upvote within each article page. This feature is a bit like:
- a Wikipedia where each user can have their own version of each article
- a Q&A website like Stack Overflow, where multiple people can give their views on a given topic, and the best ones are sorted by upvote. Except you don't need to wait for someone to ask first, and any topic goes, no matter how narrow or broad
This feature makes it possible for readers to find better explanations of any topic created by other writers. And it allows writers to create an explanation in a place that readers might actually find it.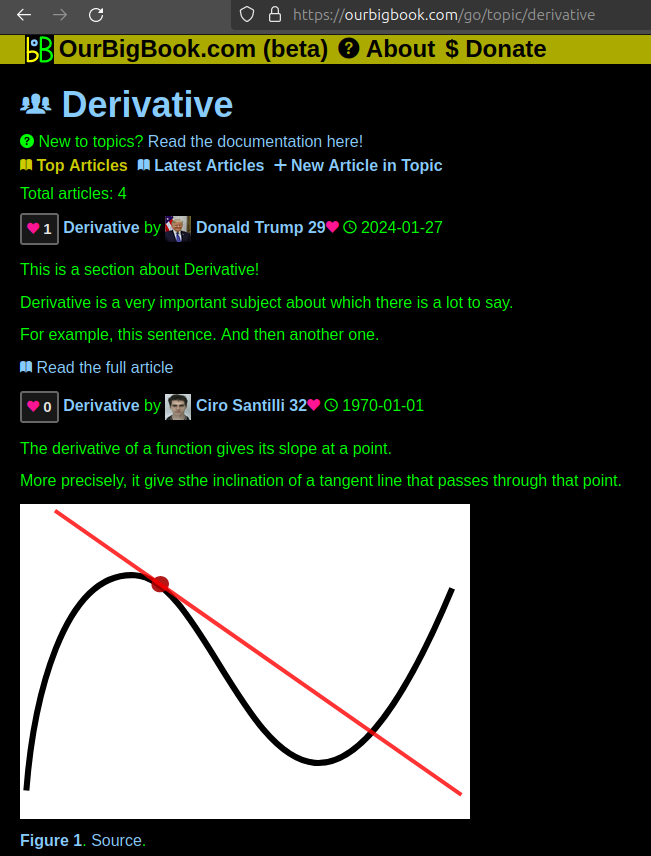
Figure 1. Screenshot of the "Derivative" topic page. View it live at: ourbigbook.com/go/topic/derivativeVideo 2. OurBigBook Web topics demo. Source. - local editing: you can store all your personal knowledge base content locally in a plaintext markup format that can be edited locally and published either:This way you can be sure that even if OurBigBook.com were to go down one day (which we have no plans to do as it is quite cheap to host!), your content will still be perfectly readable as a static site.
- to OurBigBook.com to get awesome multi-user features like topics and likes
- as HTML files to a static website, which you can host yourself for free on many external providers like GitHub Pages, and remain in full control
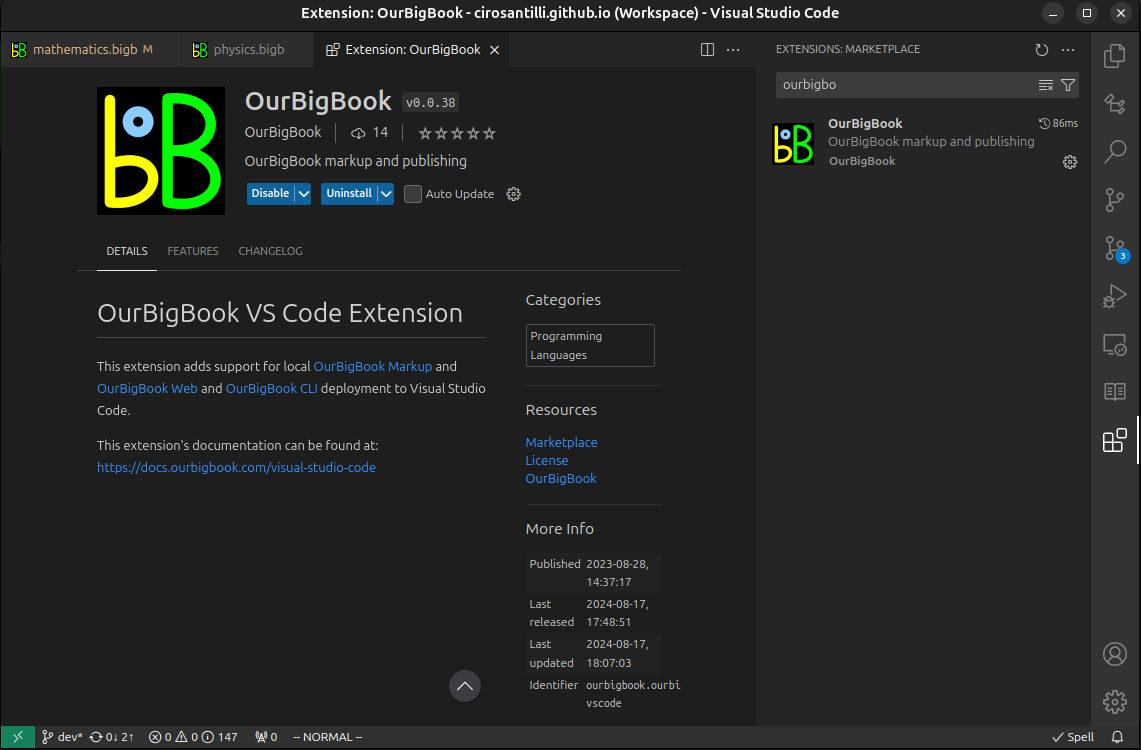
Figure 3. Visual Studio Code extension installation.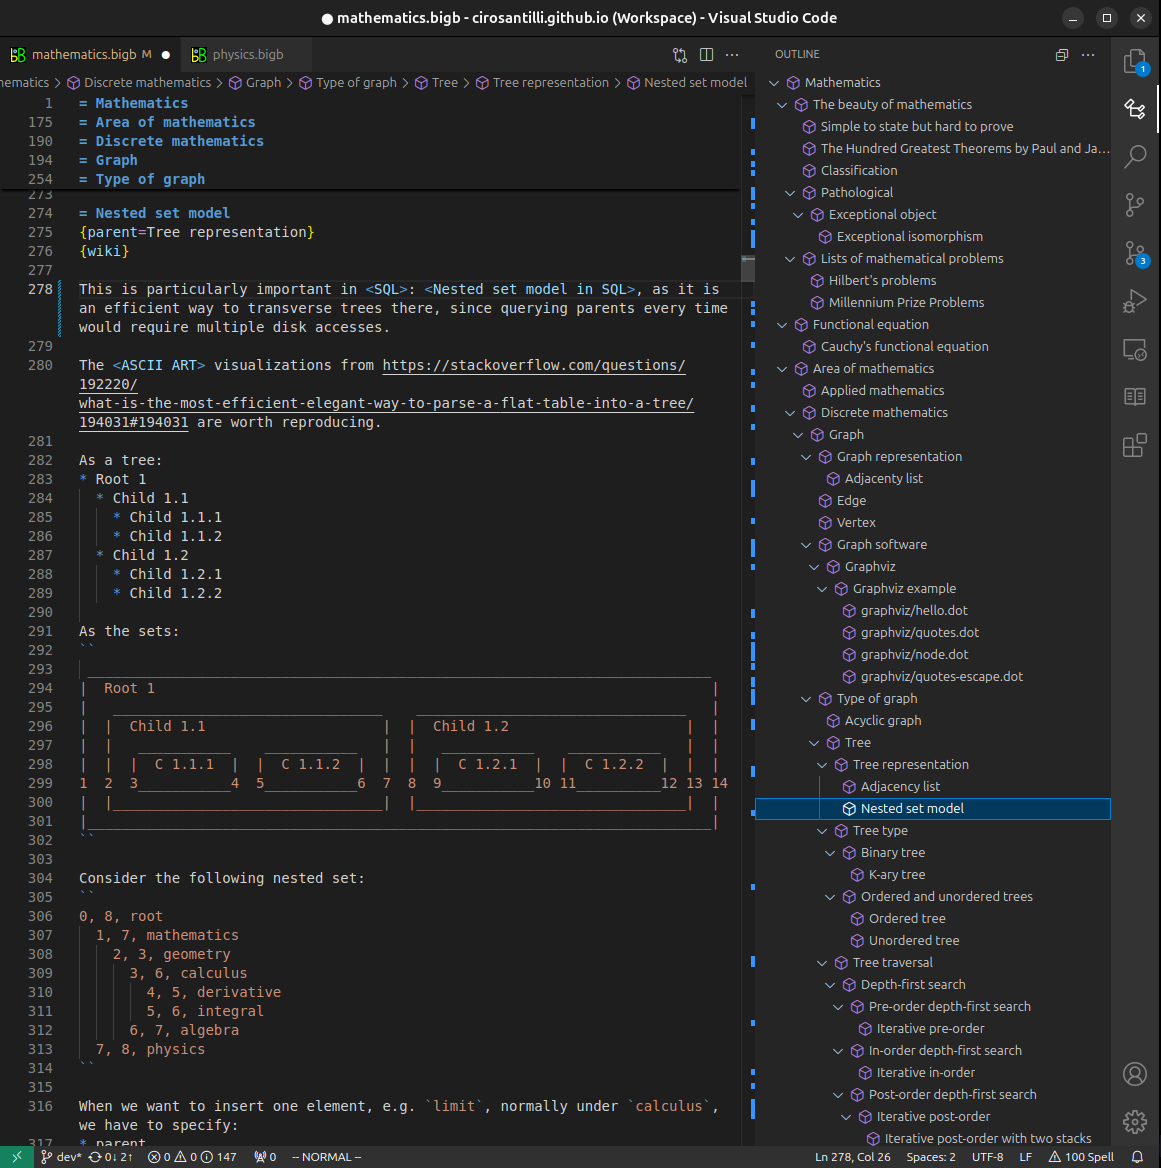
Figure 4. Visual Studio Code extension tree navigation.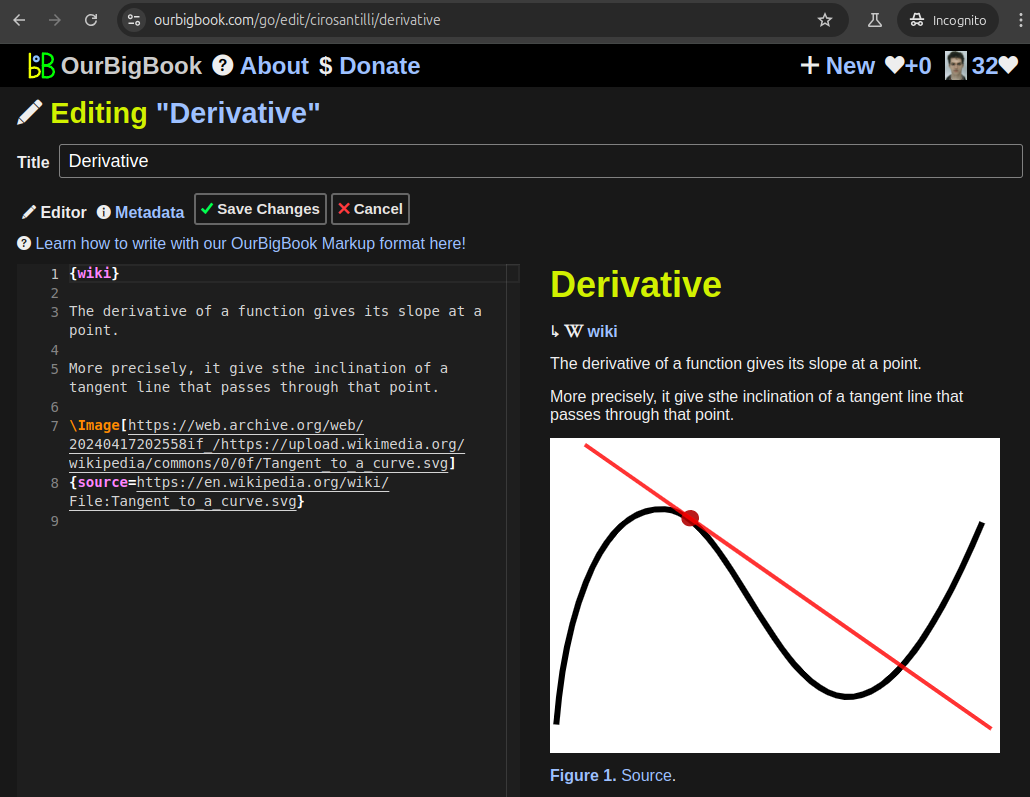
Figure 5. Web editor. You can also edit articles on the Web editor without installing anything locally.Video 3. Edit locally and publish demo. Source. This shows editing OurBigBook Markup and publishing it using the Visual Studio Code extension.Video 4. OurBigBook Visual Studio Code extension editing and navigation demo. Source. 
- Infinitely deep tables of contents:

All our software is open source and hosted at: github.com/ourbigbook/ourbigbook
Further documentation can be found at: docs.ourbigbook.com
Feel free to reach our to us for any help or suggestions: docs.ourbigbook.com/#contact