Image formation assigns each object point a corresponding image point: outgoing light rays from that object point either converge there, giving a real image, or diverge as though they originated there, giving a virtual image. The requirement applies separately to each point. Bringing unrelated light rays together makes a bright patch, but does not preserve the object's pattern. This point-by-point correspondence explains how an optical camera records a scene. [ref]
https://openstax.org/books/university-physics-volume-3/pages/2-4-thin-lenses. Ling, Sanny and Moebs, University Physics Volume 3, §2.4: Image formation by thin lenses
.Use the same convention as thin lens: place the optical lens at , with incident light travelling to the right and a real object at , . Write the image coordinate as , so for a real image and for a virtual image. Heights are positive above the optical axis and negative below it. In air, within the paraxial approximation, a thin lens obeysHere is the signed focal length, positive for a converging optical lens and negative for a diverging optical lens; the expression for assumes . Object distance is positive even though the object's coordinate is negative. These coordinate rules describe transmission through the optical lens; a mirror reverses the outgoing direction, so do not identify its image distance with this same rightward coordinate. [ref]
https://openstax.org/books/college-physics-2e/pages/25-6-image-formation-by-lenses. Urone and Hinrichs, College Physics 2e, §25.6: Lens equation and sign conventions
.The beauty of geometrical optics is that two convenient light rays can locate a point, while a whole admitted bundle forms its image. For a converging thin lens, an incident light ray parallel to the optical axis exits through the rear optical focus; a light ray through the centre continues undeviated. Real optical lens elements do not focus every admitted light ray exactly: optical aberrations and diffraction limit the point correspondence. The diagrams below are original ideal-model constructions, not measured data. [ref]
https://openstax.org/books/university-physics-volume-3/pages/2-4-thin-lenses. Ling, Sanny and Moebs, §2.4: Ray tracing and imaging limits
.The near point is the closest position at which an eye can focus comfortably by accommodation. Its distance is measured from the eye and depends on the observer. The conventional textbook reference is an assumption, not a universal anatomical constant. Angular magnification of a magnifying glass is usually referred to unaided viewing of the same object at this distance.
Two conjugate optical planes are object and image planes related by an imaging system: points in one are imaged onto corresponding points in the other in the paraxial approximation. For a converging thin lens forming a real image in air, their distances obey . Exchanging and preserves this relation; this symmetry gives the two settings of the Bessel lens displacement method.
An optical bench is a rail or aligned platform carrying an object, optical lens elements and a screen or detector at readable positions. It turns image formation into measurements of position and transverse magnification. Read distances between the optical planes rather than arbitrary holder boundaries; keep heights and optical axis alignment controlled. [ref]
https://www.pasco.com/resources/lab-experiments/484. PASCO, Object and Image Distances Thin Lens: bench apparatus and measurements
.A real image lies where the outgoing light rays from each object point actually intersect in geometrical optics. A screen or detector placed at that image plane receives the focused pattern. The screen reveals the real image; it does not create the intersection. A viewer can also see a real image without a screen if their eye receives the diverging light rays beyond the intersection. [ref]
https://openstax.org/books/college-physics-2e/pages/25-7-image-formation-by-mirrors. Urone and Hinrichs, College Physics 2e, §25.7: Real images and their observation
.For a converging thin lens and real object with , the real image has and signed transverse magnification . Inversion is a property of this particular setup, not the definition of a real image. With and , the following are predictions:
| Object distance | Image distance | Transverse magnification | Signed image height |
|---|---|---|---|
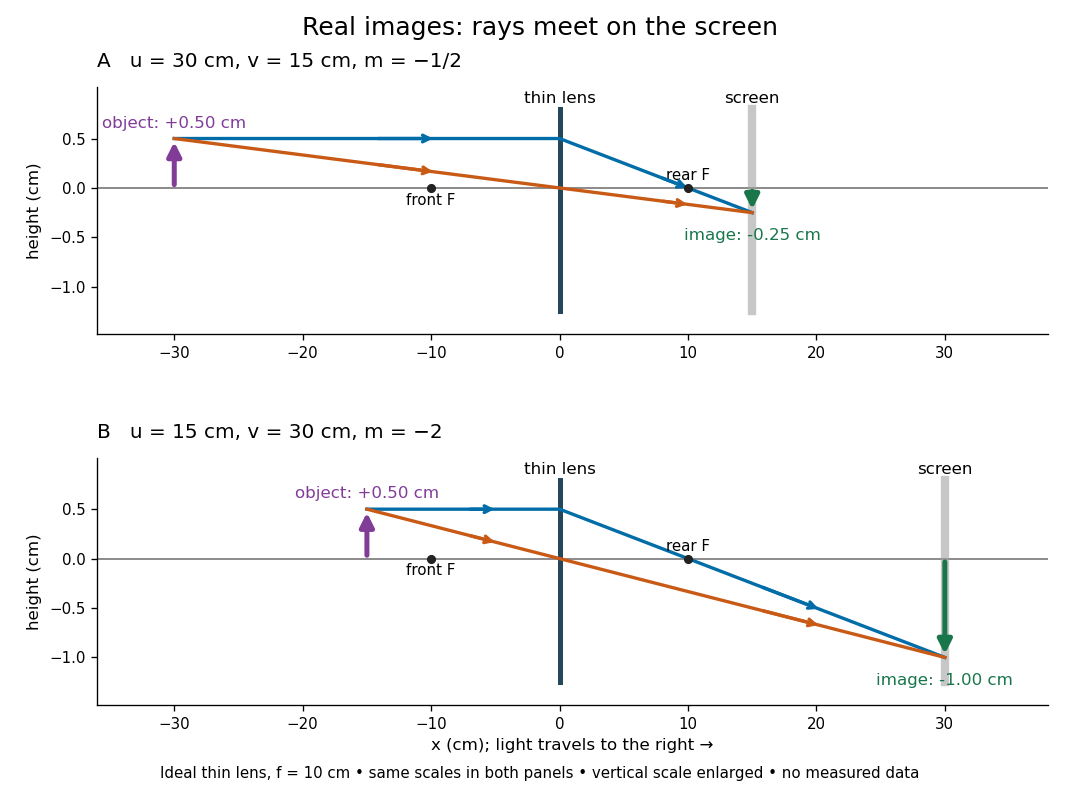

To test both image position and transverse magnification, use an optical bench with an illuminated arrow or millimetre target, a converging optical lens of nominal focal length , a movable white screen and a ruler. Measure corresponding target and image intervals, rather than guessing the whole image size when it exceeds the screen. PASCO's Experiment 12 compares distance-based and size-based magnification; the following procedure uses several object distances, as in the Northern Virginia laboratory. [ref]
https://tecnoedu.com/recursos/UNLCHidrologia/ManualesOriginalesPasco/Basic-Optics-System-Manual-OS-8515C.pdf. PASCO, Basic Optics System manual, Experiment 12, pp. 33–36
; [ref].- Align target centre, optical lens centre and screen along one optical axis, with target and screen perpendicular to it. Record bench positions of the actual target plane, optical lens plane and screen surface; distances between holder edges introduce an offset.
- Start at . Move the screen through the expected region until the target's central detail is sharpest. Record , measured , the corresponding target and image intervals, and whether the arrow is inverted. Give the measured size ratio a negative sign if inverted.
- Repeat at and . Compare the measured signed size ratio with , and calculate for each pair. The three ideal rows above are predictions to compare against, not entries to copy into the measurement record. [ref]https://sites.nvcc.edu/alphy/_files/Manuals/Physics%20242%20Lab%2011%20-%20Thin%20Lenses.pdf. Northern Virginia Community College, Physics 242 Lab 11, pp. 2–4: screen focusing, orientation and size measurements.
Keep the optical lens, illumination and central target detail fixed between trials. Approach best focus from both sides and record the interval over which sharpness is difficult to distinguish; repeat focusing to estimate its reproducibility. A modest central aperture stop tests whether peripheral light rays change the result, but also reduces brightness. Spherical aberration, chromatic aberration and diffraction can broaden the optimum; a thick optical lens also makes the chosen reference plane imperfect. Treat nominal as an initial prediction, and report position and interval-reading limits instead of forcing exact agreement. [ref]
https://www.feynmanlectures.caltech.edu/I_27.html. Feynman, Leighton and Sands, §§27-5–27-7: principal planes and imaging limits
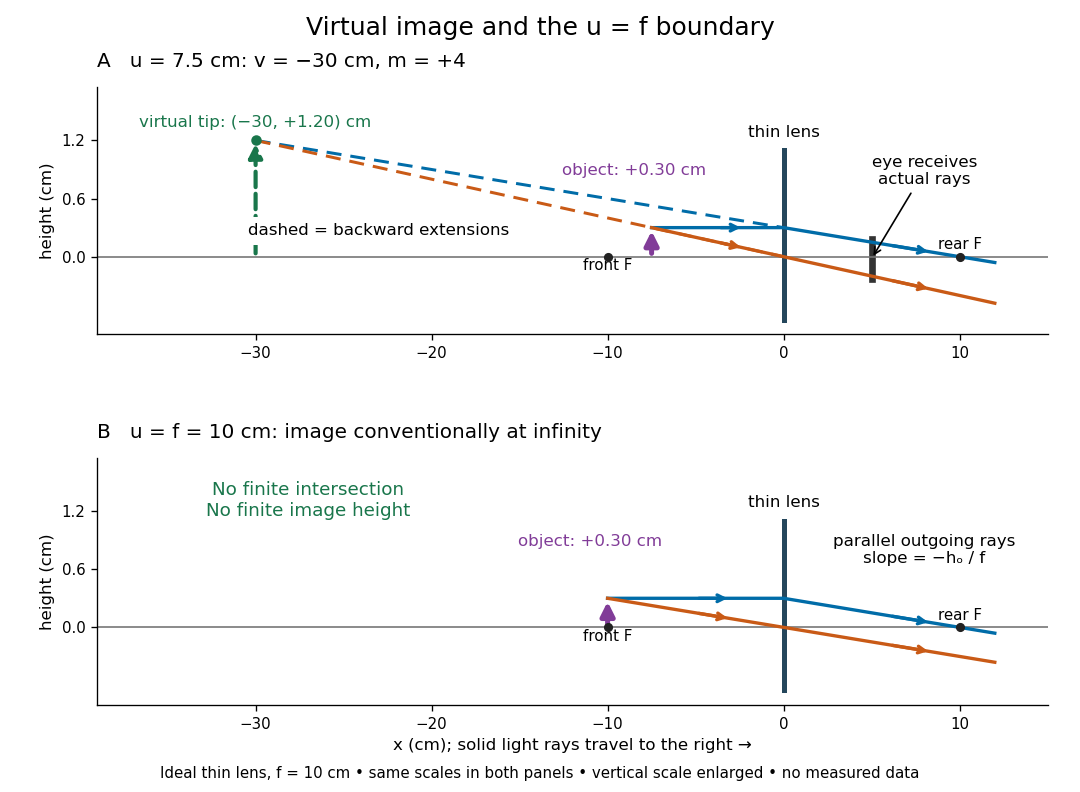
.Moving the object toward the front optical focus from outside makes the real image larger and farther away. A failed screen search near can therefore mean that the real image is beyond the bench, rather than that a virtual image has formed. At exactly , the outgoing bundle from each point is parallel and no finite screen position focuses it.
A virtual image is the apparent origin of an outgoing diverging bundle: the backward extensions of its light rays intersect at the image point. Those extensions are geometric constructions, not backward-travelling light. A screen placed there cannot intercept the outgoing bundle to display that virtual image. An eye or a second optical lens receiving the actual outgoing light rays can nevertheless form a subsequent real image. “Virtual” describes this imaging stage, not whether the image can be seen or photographed. [ref]
https://tecnoedu.com/recursos/UNLCHidrologia/ManualesOriginalesPasco/Basic-Optics-System-Manual-OS-8515C.pdf. PASCO, Basic Optics System manual, Experiment 14, pp. 41–43: viewing and reimaging virtual images
.For a converging thin lens with , the same equations give and : the virtual image is upright and enlarged. For the illustrative choice , , ,The image appears farther from the optical lens than the object. A diverging thin lens with a real object instead has and , so a virtual image need not be enlarged. A plane mirror provides another virtual image, located behind the reflecting surface by backward extensions of the reflected light rays. [ref]
https://openstax.org/books/college-physics-2e/pages/25-7-image-formation-by-mirrors. Urone and Hinrichs, College Physics 2e, §25.7: Plane-mirror images
.

For a direct viewing test, bring the target to , search for a sharp screen image on the outgoing side, then remove the screen and look through the optical lens toward the target. Expect an upright enlarged view if the eye receives the bundle and can focus. Record the eye position: beyond the optical lens gives a predicted apparent distance . This adapts the Northern Virginia laboratory's comparison. [ref]
https://sites.nvcc.edu/alphy/_files/Manuals/Physics%20242%20Lab%2011%20-%20Thin%20Lenses.pdf. Northern Virginia Community College, Physics 242 Lab 11, pp. 4–5: Virtual images with a converging lens
.For a position measurement, use parallax localization of a virtual image. Place a movable pencil tip or narrow comparison marker beside the apparent image, and view that marker directly beside or above the optical lens, while viewing the image through it. Move the head a little sideways and move the marker along the bench until relative lateral motion vanishes. Read its coordinate ; the estimate is . Deliberately place the marker nearer and farther to check that relative motion reverses on opposite sides of the match. This follows Orhan Aytür's lens laboratory, which uses a pencil to locate a virtual image. [ref]
https://www.ee.bilkent.edu.tr/~ee428/manual/html/node6.html. Orhan Aytür, Bilkent University, Experiment 2: Imaging with mirrors and lenses, §2
.Keep target and optical lens fixed, use one eye and the central image detail, and ensure the marker itself is not viewed through the optical lens. A marker blocked by the target, or a head movement that loses the bundle through the aperture, invalidates that trial. Repeat the match from both directions and record its depth range. This measures apparent depth; comparing apparent sizes at different depths does not directly measure transverse magnification. Near , apparent depth becomes very large and the match is poorly constrained. A failed screen search alone therefore needs the distance check and the viewing test.
Parallax localization of a virtual image matches the apparent depth of a virtual image to a directly viewed physical marker. A sideways change of viewpoint changes their relative apparent positions if their depths differ. Adjust the marker until that relative motion vanishes, and use its coordinate to estimate image position. The marker must be viewed directly; viewing it through the same optical lens compares two images rather than an image and a known physical depth. [ref]
https://www.ee.bilkent.edu.tr/~ee428/manual/html/node6.html. Orhan Aytür, Bilkent University, Experiment 2, §2: Pencil parallax test
.For two nearly aligned points at distances from an eye displaced sideways by , the small-angle approximation gives a change of relative viewing angle proportional to . It vanishes when , and changes sign across that match. When both distances are large, the difference is small, explaining the poor depth precision near the thin lens condition .
Magnification compares an image's scale with a specified reference. Transverse magnification compares signed lengths in object and image planes; angular magnification compares viewing angles at an observer. Both are dimensionless quantities, but they answer different questions. A projected real image twice as tall has ; an optical telescope's advertised viewing enlargement normally concerns angular magnification. [ref]
2.8 Microscopes and Telescopes. Ling, Sanny and Moebs, University Physics Volume 3, §2.8: Angular magnification and telescopes
.Always specify the sign and the reference arrangement. For signed transverse magnification, means inverted and means upright; means enlarged and means reduced. A larger virtual image can subtend a modest viewing angle if it is farther away. At , an ideal converging thin lens has no finite image height and hence no finite transverse magnification, while angular magnification can remain finite. Enlargement also does not guarantee extra detail: diffraction-limited resolution and optical aberrations limit the information available to enlarge. [ref].
Transverse magnification is the ratio of corresponding signed lengths perpendicular to the optical axis. For an ideal image of a small arrow of nonzero height,Use the same upward-positive height convention in both planes. Thus an upright arrow imaged as has : inverted and half as tall. The sign describes orientation; real image versus virtual image describes ray intersections. They are separate properties, even when a particular thin lens setup correlates them.[ref]
For a thin lens with object coordinate and image coordinate , the undeviated centre light ray is the straight line through and , so its height at is . This is the signed similar triangles argument. Combining it with the thin lens equation givesFor , gives ; gives ; gives ; and gives . At , the image is conventionally “at infinity”: the divergent expressions for and describe the limiting behaviour, not a finite image of infinite height. Different object points produce parallel bundles in different directions, which is why angular magnification remains meaningful.
The real image experiment tests in two independent ways: signed ratios of measured corresponding intervals, and from measured longitudinal distances. As a further prediction, moving from to for swaps , changing to . The two image sizes differ by a factor of four, while both images remain inverted. This reversal follows from the symmetric thin lens equation and connects to the Bessel lens displacement method.
Angular magnification is the ratio of the signed viewing angle with an optical instrument to the signed viewing angle in a stated reference arrangement. Measure both as apparent directions from the eye, positive toward the same side of the optical axis; then an inverted view has negative . If only positive angular sizes are compared, the result is and carries no orientation information. [ref]
https://openstax.org/books/college-physics-2e/pages/26-5-telescopes. Urone and Hinrichs, College Physics 2e, §26.5: Telescope angular magnification and inversion
.For the upright virtual image of a converging thin lens, let the eye be at and take the unaided reference to be the same small object at a distance from the eye. Within the small-angle approximation,Specify : keeping the object in its original position means , whereas the customary magnifier rating uses a near-point reference, often . A reference distance is a convention, not a claim that every eye has that near point. [ref]
https://openstax.org/books/university-physics-volume-3/pages/2-7-the-simple-magnifier. Ling, Sanny and Moebs, University Physics Volume 3, §2.7: Angle ratio and viewing distances
.For the virtual image diagram, , and . With , , whereas keeping the object at gives . Thus neither viewing comparison gives the transverse magnification four. A person may also be unable to focus on the unaided object at the shorter reference distance.
At , each outgoing bundle is parallel with slope ; its apparent viewing direction has angle . Consequently remains finite even though is undefined at a finite image plane. Equivalently, in the limit , the factors and both grow without bound but their ratio tends to . For and , the relaxed-view prediction is . [ref]
https://openstax.org/books/university-physics-volume-3/pages/2-7-the-simple-magnifier. Ling, Sanny and Moebs, §2.7: Image at infinity
. Articles by others on the same topic
There are currently no matching articles.