
As mentioned at Section "Computer security researcher", Ciro Santilli really tends to like people from this area.
Also, the type of programming Ciro used to do, systems programming, is particularly useful to security researchers, e.g. Linux Kernel Module Cheat.
This program makes you respect GNU make a bit more. Good old make with
-j can not only parallelize, but also take in account a dependency graph.Some examples under:
man parallel_exampesTo get the input argument explicitly job number use the magic string sample output:
{}, e.g.:printf 'a\nb\nc\n' | parallel echo '{}'a
b
cTo get the job number use sample output:
{#} as in:printf 'a\nb\nc\n' | parallel echo '{} {#}'a 1
b 2
c 3
c 3{%} contains which thread the job running in, e.g. if we limit it to 2 threads with -j2:printf 'a\nb\nc\nd\n' | parallel -j2 echo '{} {#} {%}'a 1 1
b 2 1
c 3 2
d 4 1% symbol in many programming languages such as C.To pass multiple CLI arguments per command you can use sample output:
-X e.g.:printf 'a\nb\nc\nd\n' | parallel -j2 -X echo '{} {#} {%}'a b 1 1
c d 2 2Minimal example: nodejs/sequelize/raw/recursive.js
More advanced SQL tree traversal examples: nodejs/sequelize/raw/tree.js
Similar to SQL subquery, but with some differences: stackoverflow.com/questions/706972/difference-between-cte-and-subquery
rm -f tmp.sqlite
sqlite3 tmp.sqlite 'create table t(i integer)'
sqlite3 tmp.sqlite 'insert into t values (1), (2)'
sqlite3 tmp.sqlite 'with mycte as ( select * from t ) delete from mycte where i = 1'
sqlite3 tmp.sqlite 'select * from t'This example is similar to nodejs/sequelize/raw/parallel_update_async.js, but now we are doing a separate SELECT, later followed by an update:
Although this specific example is useless in itself, as we could just use
UPDATE "MyInt" SET i = i + 1 as in nodejs/sequelize/raw/parallel_update_async.js, which automatically solves any concurrency issue, this kind of code could be required for example if the update was a complex function not suitably implemented in SQL, or if the update depends on some external data source.Sample execution:which does:
node --unhandled-rejections=strict ./parallel_select_and_update.js p 2 10 'READ COMMITTED'- PostgreSQL, see other databases options at SQL example
- 2 threads
- 10 increments on each thread
Another one:this will run SELECT FOR UPDATE rather than just SELECT
node --unhandled-rejections=strict ./parallel_select_and_update.js p 2 10 'READ COMMITTED' 'FOR UPDATE'Observed behaviour under different SQL transaction isolation levels:
READ COMMITTED: fails. Nothing in this case prevents:REPEATABLE READ: works. the manual mentions that if multiple concurrent updates would happen, only the first commit succeeds, and the following ones fail and rollback and retry, therefore preventing the loss of an update.READ COMMITTED+SELECT FOR UPDATE: works. And does not do rollbacks, which probably makes it faster. Withp 10 100,REPEATABLE READwas about 4.2s andREAD COMMITTED+SELECT FOR UPDATE3.2s on Lenovo ThinkPad P51 (2017).SELECT FOR UPDATEshould be enough as mentioned at: www.postgresql.org/docs/13/explicit-locking.html#LOCKING-ROWSFOR UPDATE causes the rows retrieved by the SELECT statement to be locked as though for update. This prevents them from being locked, modified or deleted by other transactions until the current transaction ends. That is, other transactions that attempt UPDATE, DELETE, SELECT FOR UPDATE, SELECT FOR NO KEY UPDATE, SELECT FOR SHARE or SELECT FOR KEY SHARE of these rows will be blocked until the current transaction ends; conversely, SELECT FOR UPDATE will wait for a concurrent transaction that has run any of those commands on the same row, and will then lock and return the updated row (or no row, if the row was deleted). Within a REPEATABLE READ or SERIALIZABLE transaction, however, an error will be thrown if a row to be locked has changed since the transaction started. For further discussion see Section 13.4.
A non-raw version of this example can be seen at: nodejs/sequelize/parallel_select_and_update.js.
Claimed to remove metadata from servers unless legally obliged to collect it: www.quora.com/Does-WhatsApp-store-messages-on-its-servers-or-is-all-deleted-after-delivery-and-only-stored-on-recipients-phones/answer/Ciro-Santilli
They claim to delete metadata: www.quora.com/Does-WhatsApp-store-messages-on-its-servers-or-is-all-deleted-after-delivery-and-only-stored-on-recipients-phones/answer/Ciro-Santilli
This model can work well when there is a set of commonly used libraries that some developers often use together, but such that there isn't enough maintenance work for each one individually.
So what people do is to create a group that maintains all those projects, to try and get enough money to survive from the contributions done primarily for each one individually.
Examples:

2009 Nobel Prize lecture
. Poor Charles was too debilitated by Alzheimer's disease to give the talk himself! But if you've got a pulse, you can get the prize, so all good.As of 2021, last commit from 2017.
Running:failed on Ubuntu 20.10 Node.js v14.15.3 with:Likely similar bullshit from: stackoverflow.com/questions/50111688/node-sqlite-node-gyp-build-error-no-member-named-forceset-in-v8object because the Node.js version is too new.
git clone https://github.com/Codaisseur/feathersjs-react-redux-ssr
cd feathersjs-react-redux-ssr
npm install../src/create_string.cpp:17:37: error: no matching function for call to ‘v8::String::Utf8Value::Utf8Value(v8::Local<v8::Value>&)’
17 | v8::String::Utf8Value string(value);
| ^If I try
nvm install v10I Google error messages until reaching:and the next problem is: stackoverflow.com/questions/48513573/gulp-error-gulp-hastask-is-not-a-function
diff --git a/gulpfile.js b/gulpfile.js
index b931e06..24d2cc8 100644
--- a/gulpfile.js
+++ b/gulpfile.js
@@ -14,34 +14,34 @@ gulp.task('css', function() {
            .pipe(gulp.dest('./dist'))
 })

-gulp.task('css:watch', ['css'], function() {
+gulp.task('css:watch', gulp.series('css', function() {
   gulp.watch('app/styles/**/*.sass', ['css'])
-})
+}))

 gulp.task('moveAssets', function() {
   return gulp.src('./app/assets/**/*')
              .pipe(gulp.dest('./dist/assets'))
 })

-gulp.task('build:revAssets', ['css', 'moveAssets'], function() {
+gulp.task('build:revAssets', gulp.series('css', 'moveAssets', function() {
   var rev = new $.revAll()
   return gulp.src('./dist/**/*')
              .pipe(rev.revision())
              .pipe(gulp.dest('./dist/public'))
              .pipe(rev.manifestFile())
              .pipe(gulp.dest('./dist'))
-})
+}))

 gulp.task('build:cpServer', function() {
   return gulp.src('./app/**/*.{js,ejs}')
              .pipe(gulp.dest('./dist/server-build'))
 })
-gulp.task('build:revServer', ['build:cpServer'], function() {
+gulp.task('build:revServer', gulp.series('build:cpServer', function() {
   var manifest = gulp.src('./dist/rev-manifest.json')
   return gulp.src('./dist/server-build/{components,containers}/**/*')
              .pipe($.revReplace({ manifest: manifest }))
              .pipe(gulp.dest('./dist/server-build'))
-})
+}))

 gulp.task('build', function() {
   runSequence('build:revAssets', 'build:revServer')
diff --git a/package.json b/package.json
index bcb29c3..86bd593 100644
--- a/package.json
+++ b/package.json
@@ -67,7 +67,7 @@
     "redux-thunk": "^0.1.0",
     "request": "^2.79.0",
     "rewire": "^2.3.4",
-    "run-sequence": "^1.2.2",
+    "run-sequence": "^2.2.1",
     "serve-favicon": "^2.3.2",
     "socket.io-client": "^1.7.2",
     "superagent": "^1.4.0",
@@ -86,16 +86,16 @@
     "concurrently": "^2.0.0",
     "cross-env": "^1.0.7",
     "enzyme": "^2.3.0",
-    "gulp": "^3.9.0",
+    "gulp": "^4.0.2",
     "gulp-autoprefixer": "^3.1.0",
     "gulp-load-plugins": "^1.2.0",
     "gulp-rev": "^6.0.1",
-    "gulp-sass": "^2.1.1",
+    "gulp-sass": "4.1.0",
     "gulp-sourcemaps": "^1.6.0",
     "jsdom": "^7.0.1",
     "mocha": "^2.4.5",
     "nock": "^2.17.0",
-    "node-sass": "^3.4.2",
+    "node-sass": "^5.0.0",
     "nodemon": "^1.6.0",
     "react-addons-test-utils": "^15.3.2",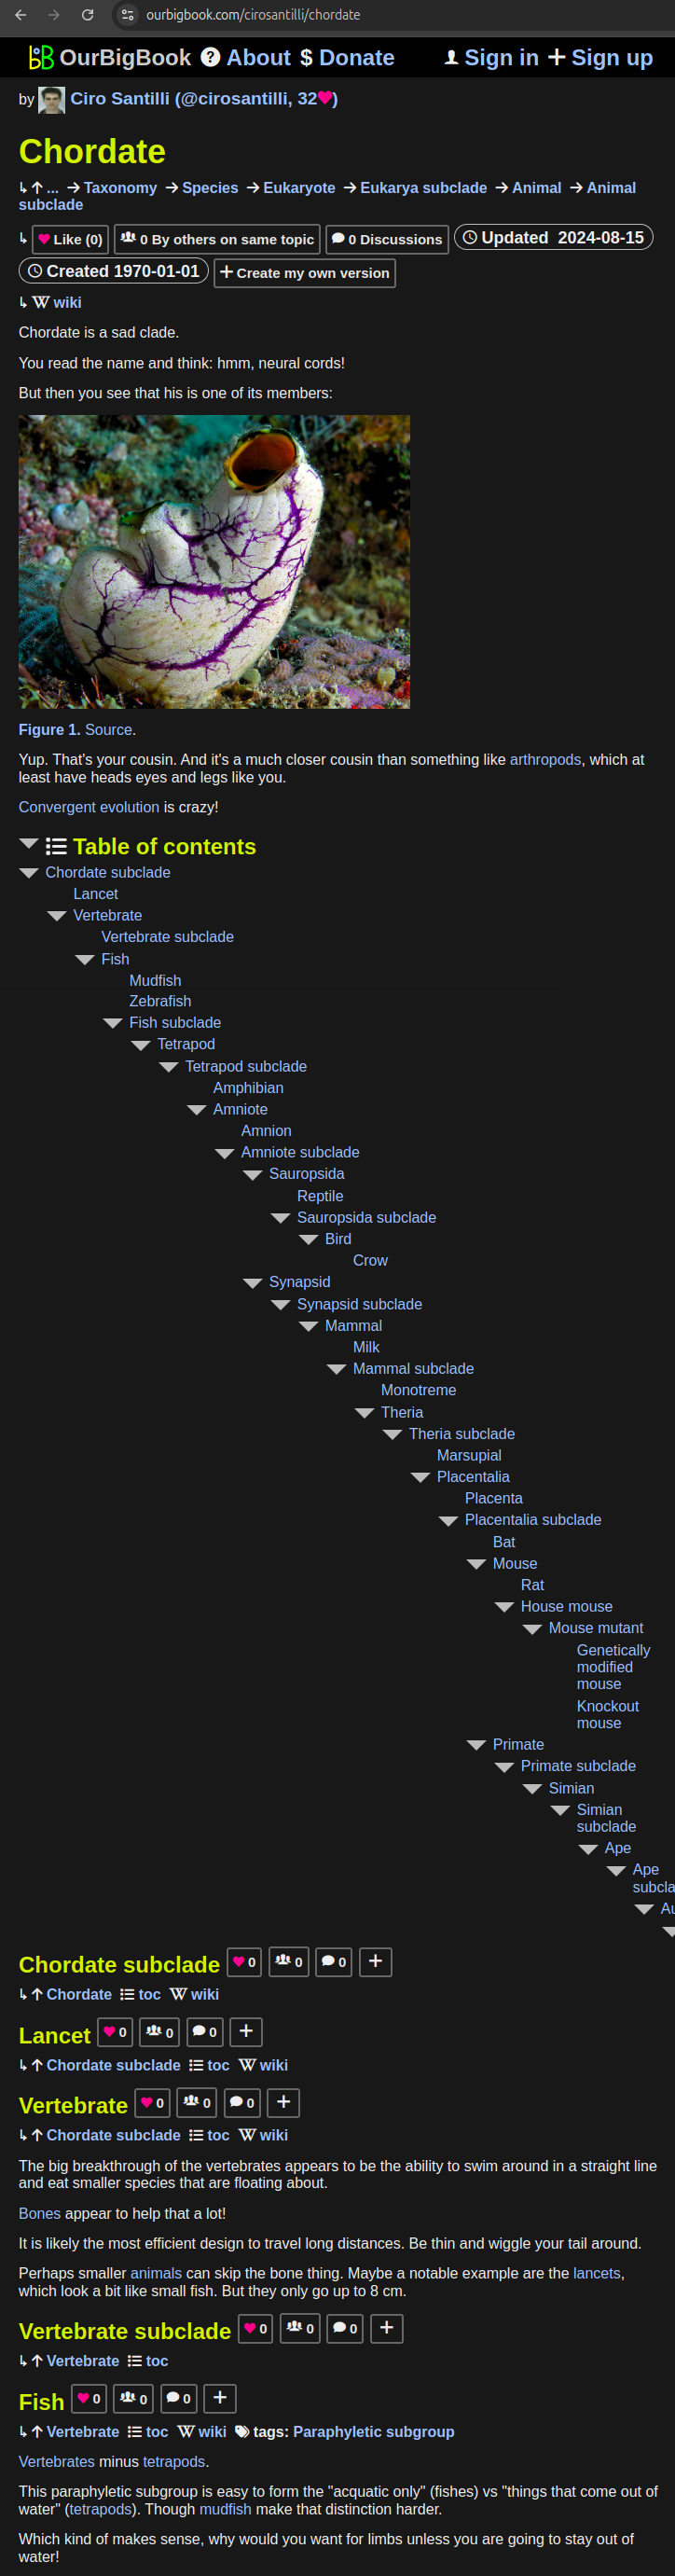
"react-transform-catch-errors": "^1.0.0", Pinned article: Introduction to the OurBigBook Project
Welcome to the OurBigBook Project! Our goal is to create the perfect publishing platform for STEM subjects, and get university-level students to write the best free STEM tutorials ever.
Everyone is welcome to create an account and play with the site: ourbigbook.com/go/register. We belive that students themselves can write amazing tutorials, but teachers are welcome too. You can write about anything you want, it doesn't have to be STEM or even educational. Silly test content is very welcome and you won't be penalized in any way. Just keep it legal!
Intro to OurBigBook
. Source. We have two killer features:
- topics: topics group articles by different users with the same title, e.g. here is the topic for the "Fundamental Theorem of Calculus" ourbigbook.com/go/topic/fundamental-theorem-of-calculusArticles of different users are sorted by upvote within each article page. This feature is a bit like:
- a Wikipedia where each user can have their own version of each article
- a Q&A website like Stack Overflow, where multiple people can give their views on a given topic, and the best ones are sorted by upvote. Except you don't need to wait for someone to ask first, and any topic goes, no matter how narrow or broad
This feature makes it possible for readers to find better explanations of any topic created by other writers. And it allows writers to create an explanation in a place that readers might actually find it.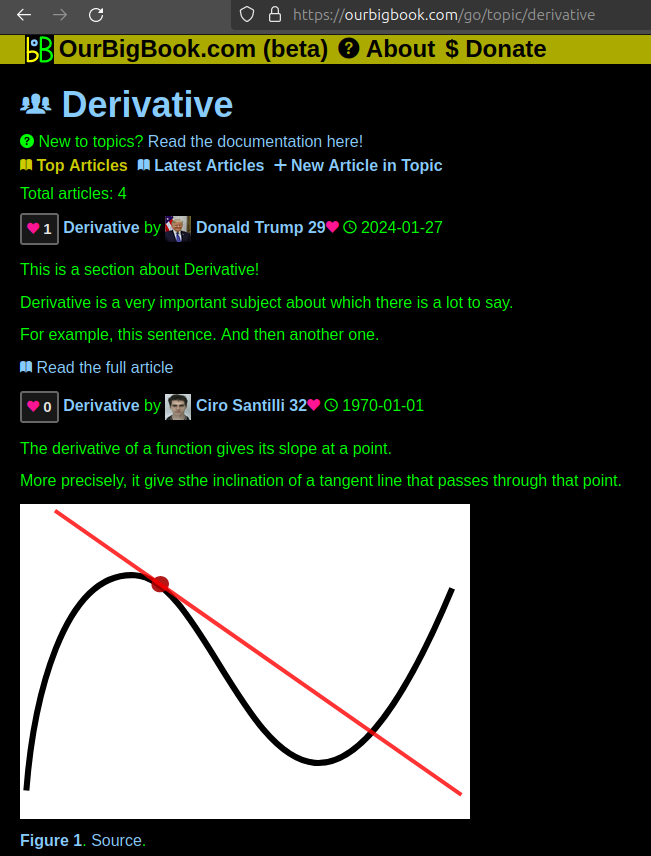
Figure 1. Screenshot of the "Derivative" topic page. View it live at: ourbigbook.com/go/topic/derivativeVideo 2. OurBigBook Web topics demo. Source. - local editing: you can store all your personal knowledge base content locally in a plaintext markup format that can be edited locally and published either:This way you can be sure that even if OurBigBook.com were to go down one day (which we have no plans to do as it is quite cheap to host!), your content will still be perfectly readable as a static site.
- to OurBigBook.com to get awesome multi-user features like topics and likes
- as HTML files to a static website, which you can host yourself for free on many external providers like GitHub Pages, and remain in full control
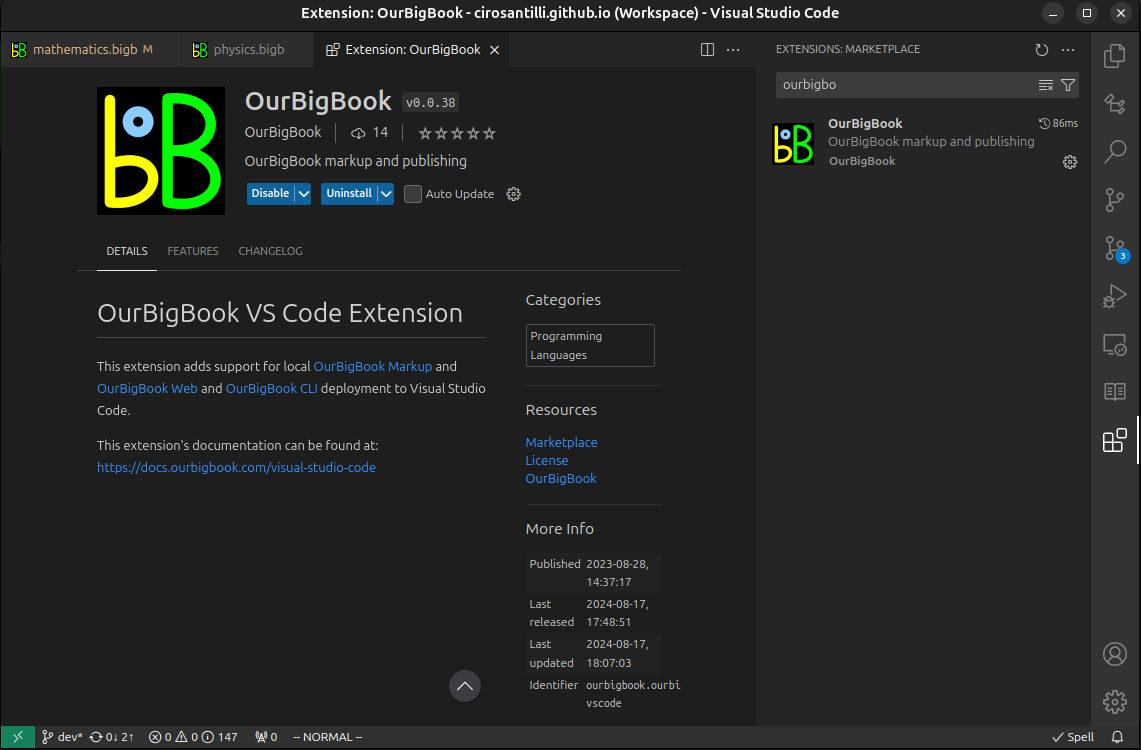
Figure 3. Visual Studio Code extension installation.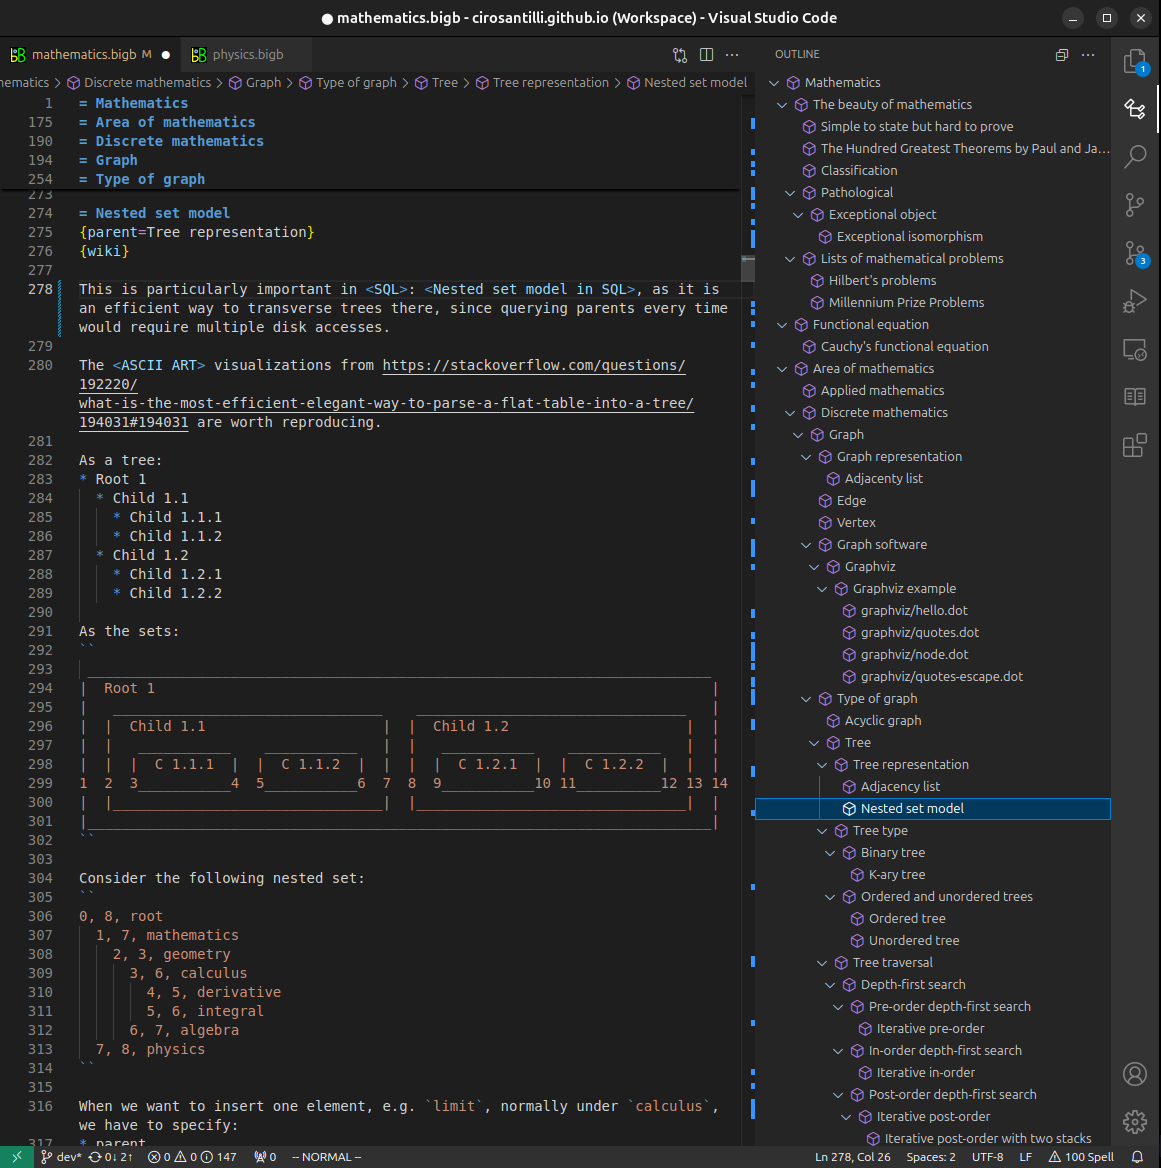
Figure 4. Visual Studio Code extension tree navigation.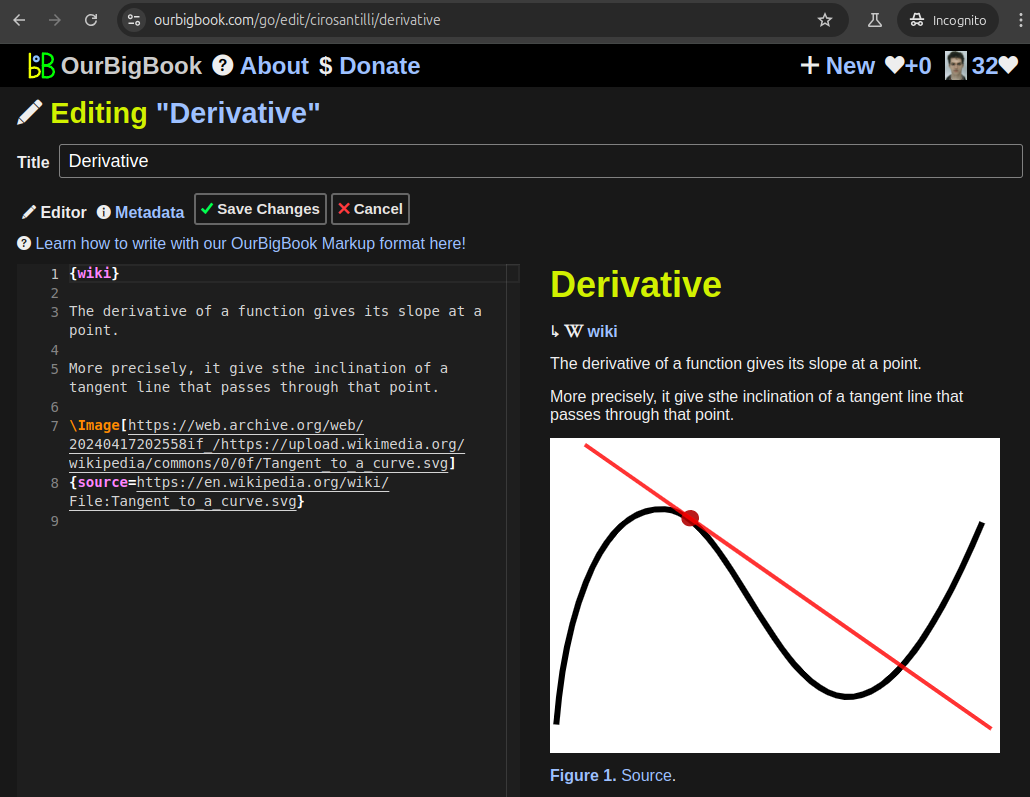
Figure 5. Web editor. You can also edit articles on the Web editor without installing anything locally.Video 3. Edit locally and publish demo. Source. This shows editing OurBigBook Markup and publishing it using the Visual Studio Code extension.Video 4. OurBigBook Visual Studio Code extension editing and navigation demo. Source. 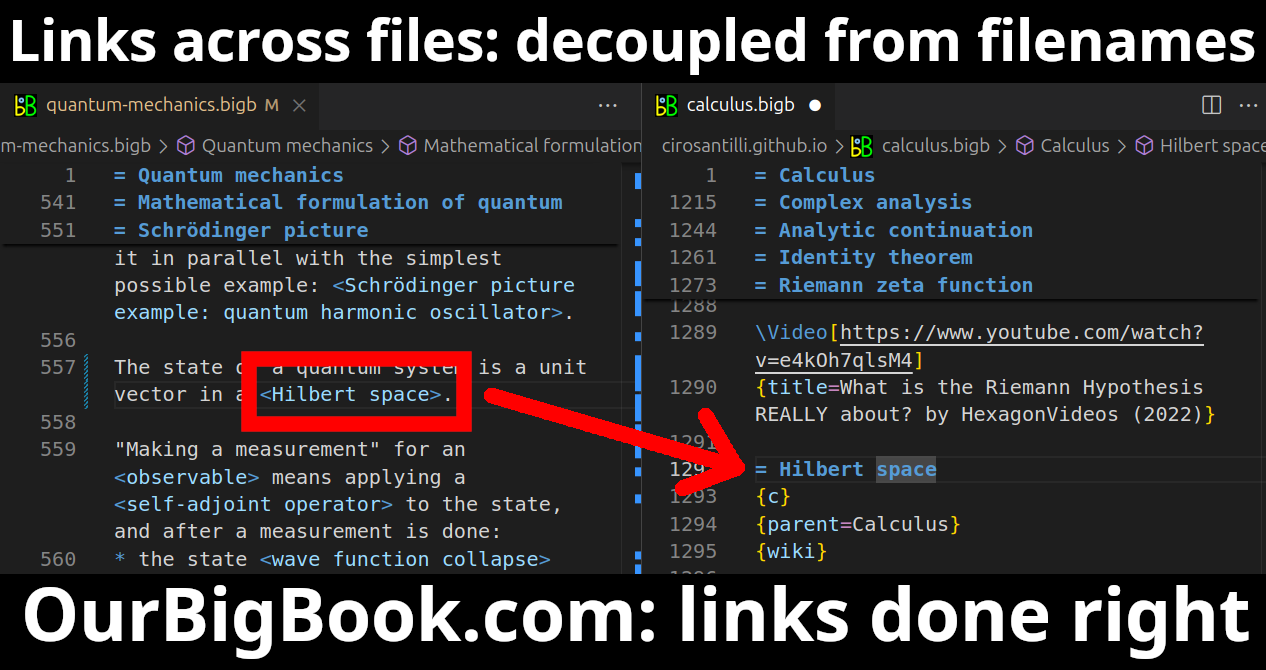
- Infinitely deep tables of contents:

All our software is open source and hosted at: github.com/ourbigbook/ourbigbook
Further documentation can be found at: docs.ourbigbook.com
Feel free to reach our to us for any help or suggestions: docs.ourbigbook.com/#contact